Similar to Windows PC, Mac also provides a simple way to directly capture anything displayed on Mac screen. This screenshot feature is built into macOS. You don’t need to install any additional software. However, many users have reported that they are unable to take screenshots and screenshot on Mac is not working.
Why screenshot not working on Mac? In fact, it is one kind of common issue that captured image cannot be saved when you take a screenshot on Mac.

Various reasons will cause the screenshot feature not working on your Mac. This post will give you 5 useful tips to troubleshoot this screenshot on Mac not working problem.
- Part 1. Restart Mac to Fix Screenshot on Mac Not Working
- Part 2. Check Screenshot Shortcut Settings
- Part 3. Reset NVRAM to Fix Screenshot Not Working on Mac
- Part 4. Use Grab to Replace the Screenshot Feature on Mac
- Part 5. Use Professional Screenshot Software to Capture Mac Screen
- Part 6. FAQs of Screenshot on Mac Not Working
Part 1. Restart Mac to Fix Screenshot on Mac Not Working
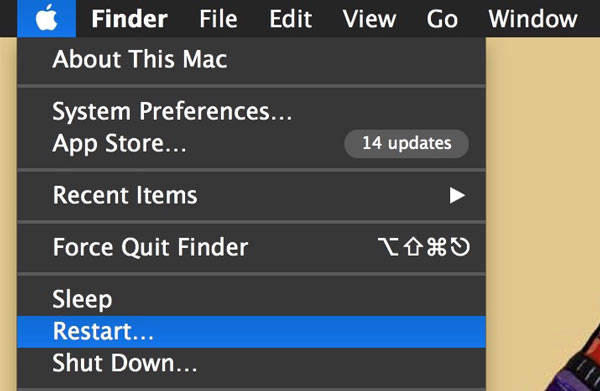
As you should know, restarting is always a good and effective solution to deal with various problems. So, when the screenshot feature cannot work on your Mac, you can choose to restart Mac to fix the issue.
But before you do that, you need to make sure your keyboard functions normally. Then you can take the regular way to restart your Mac. Here you can click the Apple icon on the upper-left corner and then choose the Restart option to perform a restarting on your Mac. After that, you can screenshot Mac again to check if the problem is solved.
Part 2. Check Screenshot Shortcut Settings to Fix Screenshot Not Working on Mac
As it mentioned above, you can use some screenshot shortcuts to capture your Mac screen with ease. For instance, you can press Command + Shift + 3 to capture a full-screen Mac screenshot and Command + Shift + 4 to capture part of screen. So, when the screenshot on Mac not working, you should check these default shortcuts.
Step 1 First, you can click the Apple icon on the upper-left corner. Choose the System Preferences option.
Step 2 Click Keyboard and then select the Shortcuts tab.
Step 3 Now you need to choose Screenshots on the left pane, and then check the current screenshot shortcuts settings on the right.
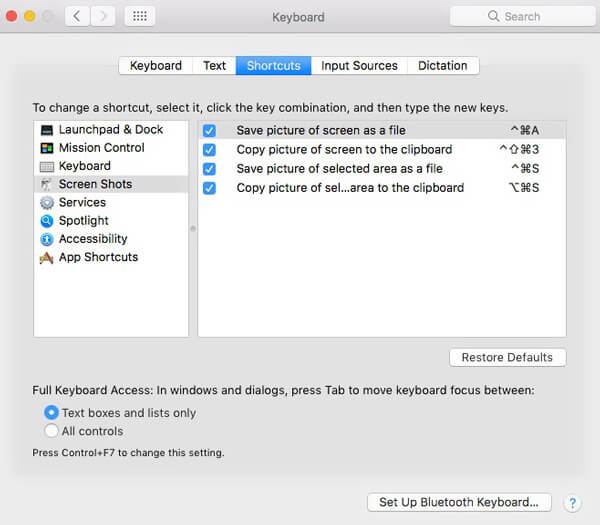
Step 4 You can tick all the screenshot options and then click Restore Defaults to set them back to default settings. By doing so, you can ensure the shortcuts won’t be altered.
Do not miss this article to take screenshots on Mac.
Part 3. Reset NVRAM to Fix Screenshot Not Working on Mac
NVRAM (Nonvolatile Random-Access Memory) is mainly used to control the internal settings of your Mac. You can try resetting NVRAM to fix screenshot on Mac not working issue.
Step 1 To reset NVRAM, you should shut down your Mac first.
Step 2 Wait for a while and press the Power button to turn Mac on. At the same time, press Option + Command + P + R keys together. After the Mac restarting, your Mac NVRAM settings are reset. Then you can take a screenshot and check if the screenshot feature works normally.
Part 4. Use Grab to Replace the Screenshot Feature on Mac
Besides the screenshot keyboard shortcuts, you can also rely on other ways to take a screenshot on Mac. Grab is a built-in screenshot application in macOS that enables you to capture Mac with entire screen, active window and custom region. So when you face the screenshot not working on Mac, you can Grab to screenshot on Mac.
Step 1 To screenshot on Mac with Grab, you should find and open it first. You can open Applications and then tap Utilities. When you enter the Utilities window, you can scroll down to locate the Grab app.

Step 2 Open the Grab app and then click on Capture. Now you can freely capture your Mac screen with it.
Part 5. Use Professional Screenshot Software to Capture Mac Screen
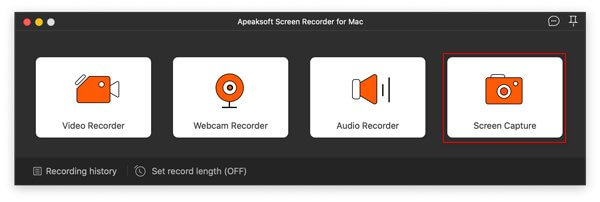
Besides the Grab, there are other free screenshot apps that can help you take a screenshot on Mac with high quality. Here we strongly recommend the popular Screen Recorder for you to screenshot on Mac. It has the capability to capture Mac with full screen, active window and selected area. More importantly, it allows you to save your Mac screenshot in any popular image format including JPG, PNG, GIF and more.
Step 1 This Mac screenshot feature is totally free. You can double click on the download button above and then follow the instructions to install and run it on your Mac. Ensure you download the Mac version.
Step 2 Choose the Screen Capture feature when you enter this screenshot app.
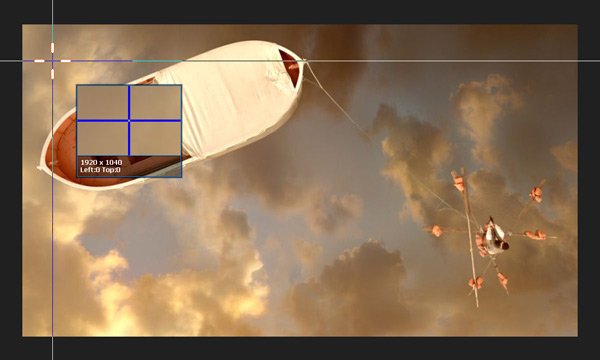
Step 3 After choosing the Screen Capture feature, your mouse will be the shape of a cross. You can freely select the area you want by dragging your mouse.
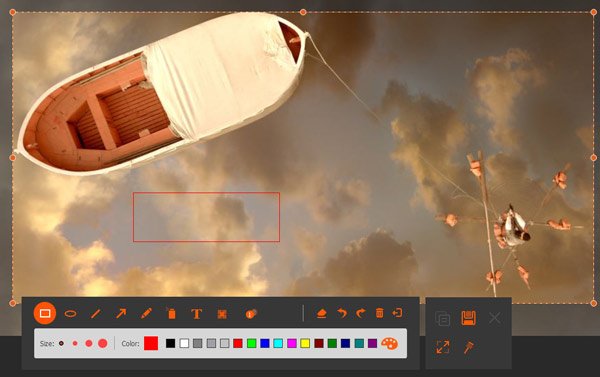
Step 4 When you get the Mac screenshot, you are given some editing features to edit it and adjust its output effect. During this step, you are allowed to draw the border, line, arrows and any shape you need on the screenshot. Moreover, you can adjust the size and color of it.
Step 5 If you are satisfied with the Mac screenshot, you can click the Save button to save it in any popular image format like JPG, PNG, BMP, GIF, or TIFF. It will also pop up a window for you to choose the save path.
You can also use this program to record FaceTime.
Part 6. FAQs of Screenshot on Mac Not Working
Question 1. How to take a full-page screen capture on a Mac?
You can press ⌘ + Shift + 3 buttons to capture your entire screen as a screenshot on Mac. You can also press ⌘ + Shift + 4 buttons to screenshot an area of your Mac screen. If you want to capture a full web page, you have to rely on some browser extension or apps.
Question 2. Where are the screenshots saved on Mac?
To quickly locate the screenshots on your Mac, you can press the Command + Shift + 5 and then choose the Options. You can select ‘Desktop’ as path and tick “Remember Last Selection”.
Question 3. What the default snipping tool for Mac?
You can easily take a screenshot on Mac with shortcuts keys. Also, you can rely on Grab or Preview from the Apps to take snapshots on Mac. Grab is more like the default snipping tool for Mac to take screenshots.
Conclusion
When you get the screenshot on Mac not working issue, you can get 5 easy solutions from this post to fix it. If you have more troubleshooting and communicating ideas, you can share them in the comment part.