How to Screenshot Still Images from Videos in Windows Media Player
Today, the video has become the most important way to get entertainment. There are many important moments that you may want to capture and save. For instance, you may want to capture a memorable moment or a goof in a movie to share it with your friends or on social media.
As the default media player on PC, Windows Media Player can meet your needs. This guide intends to talk about how to screenshot in Windows Media Player. Read more!
PAGE CONTENT:
Part 1: How to Screenshot in Windows Media Player 11/12
If you are using the latest version of Windows Media Player, you may need some help from Microsoft Paint. You can learn how to capture a still image from a video in the new Windows Media Player from the steps below:
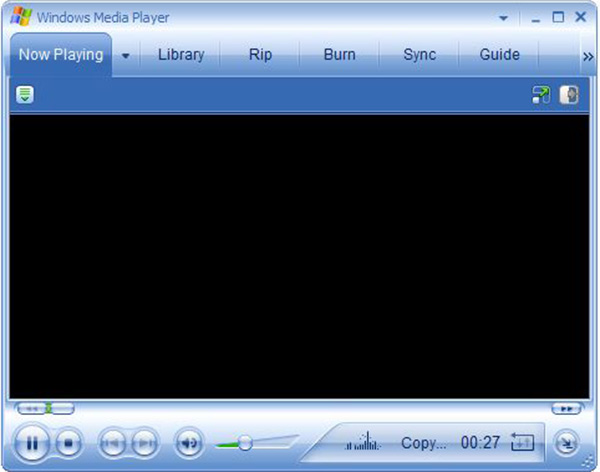
Step 1. Open the video you want to screenshot in the new version of Windows Media Player (Windows Media Player not working).

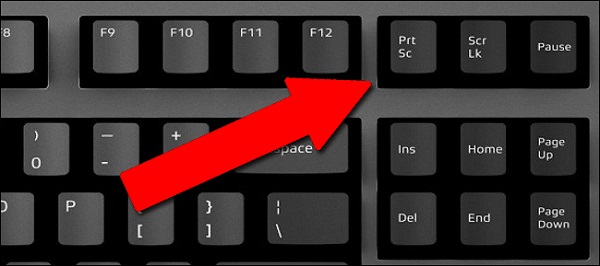
Step 2. Use the Fast forward and Rewind buttons at the bottom to find the desired frame. Press the Print Screen key on your keyboard.
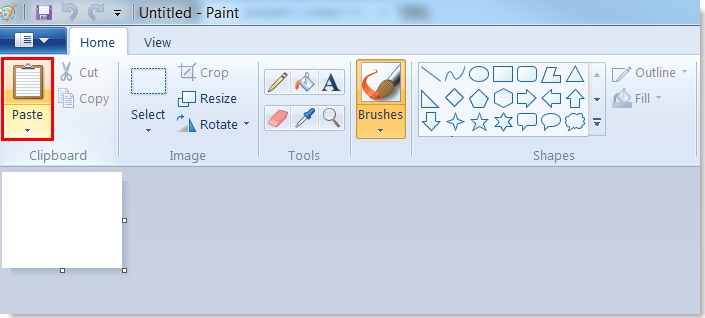
Step 3. Run MS Paint from the Start menu, and click the Paste menu on the top ribbon to paste the still image.
Step 4. Edit it and remove unwanted areas. Then go to the File menu, choose Save As and save the still image to your hard drive.
Part 2: How to Take Screenshots in Windows Media Player 10
Windows Media Player 10 actually has a built-in feature to take screenshots, which means you can capture any scene while playing videos directly. And the operations are quite easy. You just need to use some shortcuts. Follow the steps below to learn how to take a screenshot in Windows Media Player 10:
Step 1. Open a video in WMP 10, and press the Pause button at the bottom when you see the footage you want to capture.
Step 2. Press the Ctrl + I keys at the same time on your keyboard. Then you will see the Save Captured Image alter.
Step 3. Then you can find the still image in your picture library.
Tips: This way is only available to movie files supported by Microsoft. If not, you won’t get the Save Captured Image alter or the screenshot.
Part 3: How to Screenshot Still Images in Windows Media Player on XP and Earlier
For older versions of Windows Media Player that are commonly found on Windows XP or earlier systems, they do not have the built-in screenshot feature available in newer versions. To capture a still image in WMP, you need to adjust some video settings and use the Print Screen method. The steps below show how to screenshot in Windows Media Player on Windows XP or prior:
Step 1. Run Windows Media Player, go to the Organize menu and choose Options. Or you can find Options in Tools on the menu bar.
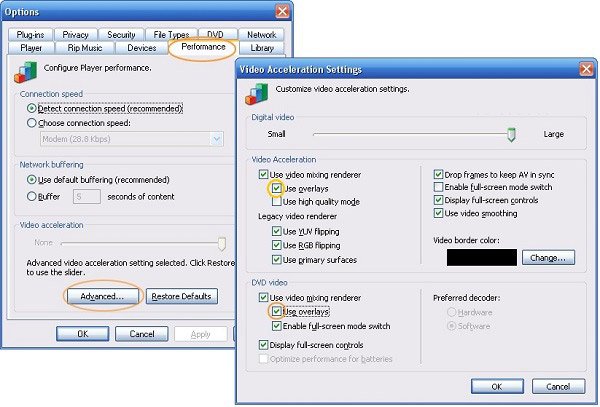
Step 2. Go to the Performance tab on the pop-up dialog and click the Advanced button. Make sure to check Use video mixing render and uncheck Use overlays. Click OK and then hit Apply.
Step 3. Now you can use your Print Screen key to capture a still image from a video in Windows Media Player.
Tips: For old versions of WMP, if you do not disable the overlays, you can get nothing but a black image when taking screenshots.
Part 4: Easiest Way to Screenshot Windows Media Player
It may be a bit complex to capture a still image from the video in various versions of Windows Media Player. The good news is that Apeaksoft Screen Recorder can help you solve all problems. You can use it to take screenshots of any video on any version of WMP. Besides taking snapshots, you can also use it to record video, audio, game, webcam, and even your phone screen. If needed, you can even add custom watermarks on the recording to protect your work. Needless to say, it is the easiest choice to screenshot Windows Media Player on Windows 11/10/8/7.
Screenshot Any Windows Media Player
- Capture still images from video in any Windows Media Player Version, whether they are WMP 12,11,10, or earlier.
- Produce screenshots with high quality.
- Edit or draw the video screenshots directly.
- Support capturing long screenshots with a scrolling window.
Secure Download
Secure Download

How to Capture a Still Image from a Video on Windows Media Player with Ease
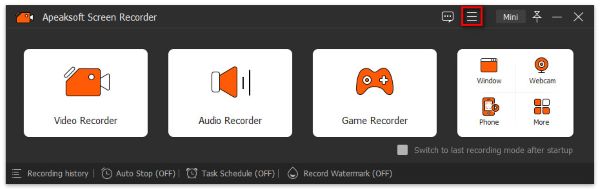
Step 1. Set up Screen Recorder
Run the best screenshot tool for Windows Media Player after you install it on your PC from the button above. Open the Preferences dialog from the Menu option. Then you can change options related to screenshot format, hotkeys and more.
Step 2. Take a screenshot of the video
Play a video in Windows Media Player and pause it when you see the desired frame. Switch to Screen Recorder and choose Screen Capture. Now, the cursor will turn into a cross. Click and drag your mouse to cover the entire Windows Media Player window or a part of the image.
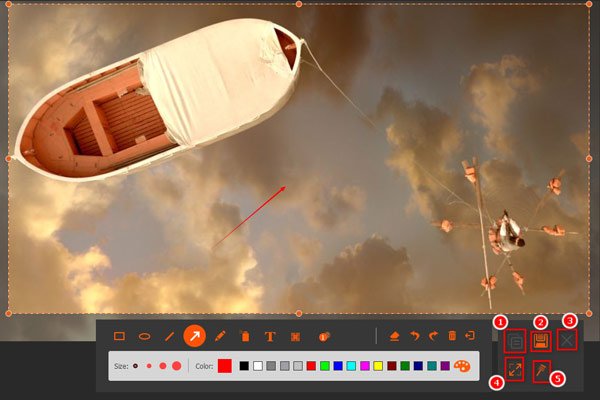
Step 3. Step3 Edit and save the screenshot
Once you release your mouse, the toolbar will pop up with several options. Here you can edit and save the still image. To add some text, for example, choose the big T button. Then set color, font, size and more. Click the right position on the screenshot and type in the text.
After editing, you have several options to deal with the final still image:
Preview screenshot: Click the Enlarge button to view the screenshot in full screen.
Save screenshot to hard disk: Click the Save button and Screen Recorder will save it based on your settings.
Send screenshot to clipboard: If you wish to use the screenshot in other applications, like MS Word, click the Clipboard button, and paste it into the target app.
Pin to screen: Click the Pin button.
Apart from taking screenshots of a still image from a video, you can also use it to record the video on PC without any hassle.
Part 5: FAQs of Windows Media Player Screenshot
How do I capture an image from a video in VLC Media Player?
Unlike Windows Media Player, VLC has built-in screenshot functionality. However, you need to unhide it by enabling Advanced Controls in the View menu. Then you will get a camera button on the extra toolbar. It can capture still images from video.
Where do screenshots go in Windows 10?
The answer is varied depending on how you take screenshots. If you press the Print Screen key alone, the screenshot will be saved in the clipboard. The button combination of Windows + Print Screen will take a screenshot on Windows 10 and save it as PNG in the default Pictures folder.
Does Windows 10 have a built-in screenshot maker?
Yes, Microsoft has introduced several utilities to take screenshots on Windows 10. In addition to shortcuts, the Snipping Tool is available in Windows 7 and later. The new Snip & Sketch tool is also able to capture still images from video.
Does Windows have a built-in video recording tool?
Yes. Windows 10 and higher versions have a built-in video capture tool called Xbox Game Bar. You can use it to record videos for free.
Why does it appear black when screenshotting WMP videos?
It may be caused by the video hardware acceleration or overlay settings. This issue always occurs in older Windows Media Player versions and you have enabled the Overlay feature. You can follow the steps in Part 3 to solve this problem.
Conclusion
This guide has shared the easiest methods to capture still images from video in Windows Media Player. What you need to do is to pick the most appropriate one and follow our guide to capture what you want. Apeaksoft Screen Recorder, for example, offers extensive, useful functionalities for free.
 Apeaksoft Screen Recorder
 Record any video and audio on phone and computer screen.
Secure Download
Secure Download
