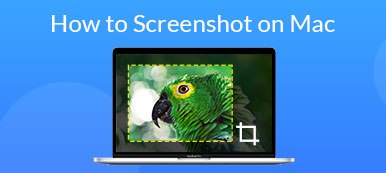
Today, it is pretty easy to take screenshots for full screen, custom region, or a specific window with the built-in utilities on PC and Mac. However, there are still many people asked where do screenshots go. It makes sense when you consider that Windows and Mac save your screenshots in a particular folder or clipboard depending on your activity. This guide will tell you how to find your screenshots on Windows and Mac in various situations.

- Part 1: Where Do Screenshots Go on PC/Mac by Default
- Part 2: Best Way to Screenshot on PC and Mac
- Part 3: FAQs about Where Do Screenshot Go on PC/Mac
Part 1: Where Do Screenshots Go on PC/Mac by Default
Where Do Screenshots Go on PC
If you simply press your Print Screen key, your screenshot will be saved in clipboard. You have to paste it to another application, such as MS Paint, Word and more, and save to your hard drive.
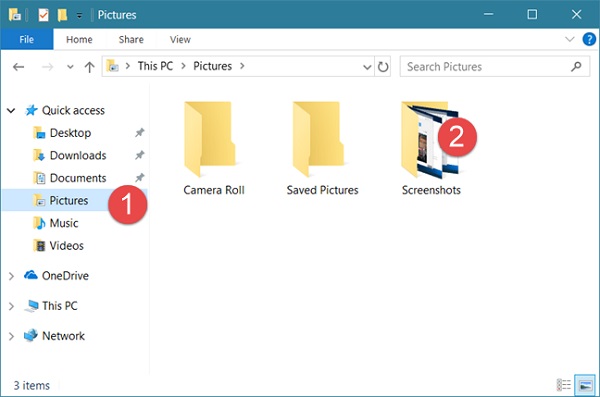
Where do screenshots go on PC if you press the shortcut of Windows + Print Screen? The answer is the default Screenshots folder. The path is C:\Users\[your name]\Pictures\Screenshots. Replace [your name] with your user account.
You can also access your Screenshots via Photos app. When you open Photos app, just find Albums, and then click Screenshots to have a check.
By the way, we'd like to mention that you can change the default path for saving screenshots if you want to do so.
Where Are Screenshots Saved on Mac
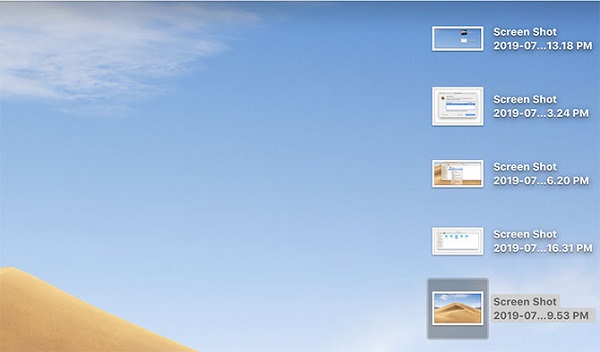
When it comes to macOS Mojave or later, it is easy to find where are screenshots saved. You can take screenshots for full screen or a portion of screen with the shortcut of Shift + Command + 3 or Shift +Command + 4. By default, the screenshots go to your desktop as PNG files.
Part 2: Best Way to Screenshot on PC and Mac
The default screenshot utilities are only simple ways to use on PC and Mac, but not the best option. They, for example, work totally different on the two platforms. That makes things complex. If you wish to get the consistent experience and more useful features, Apeaksoft Screen Recorder is worth to try.

4,000,000+ Downloads
Take screenshots for full screen, a window or custom region.
Use your mouse or customizable hotkeys to screenshot.
Offer extensive custom options, like decide where to save screenshots.
Completely free to use with no requirement of registration.
Needless to say, it is the best option to take screenshots for any region of your screen on PC and Mac. You can also utilize it to screenshot on Lenovo, record FaceTime Call and more.
How to Take Screenshots on Windows 10
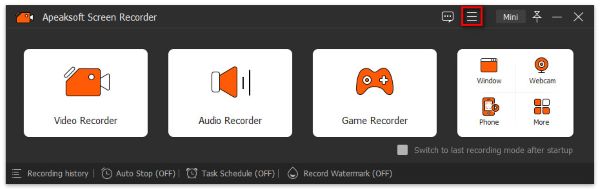
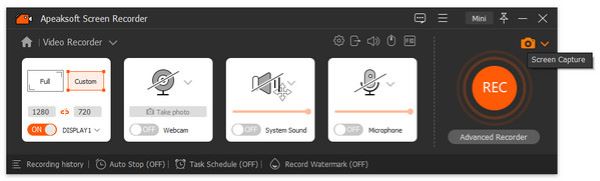
Step 1 Set up Screen Recorder
There are two versions of the best screenshot utility, one for Windows 10/8/7 and the other for macOS. You can download and install the right version according to your system. Then launch it and go to the Preferences dialog from the Menu option. Head to the Output tab from the left sidebar and you can see where do screenshots go in the Location of screenshot files box. To change it, click the Folder button and select a new folder. Moreover, you can change screenshot format, hotkeys and other options on the Preferences dialog.
Step 2 Take a screenshot and edit it
Enter the screen you wish to capture, such as a window, a video frame and more, and click Screen Capture in the home interface. Now, your cursor will change to a cross. Click and drag your mouse to cover the desired region. Once you release your mouse, the screenshot is successful and you will be presented the toolbar.
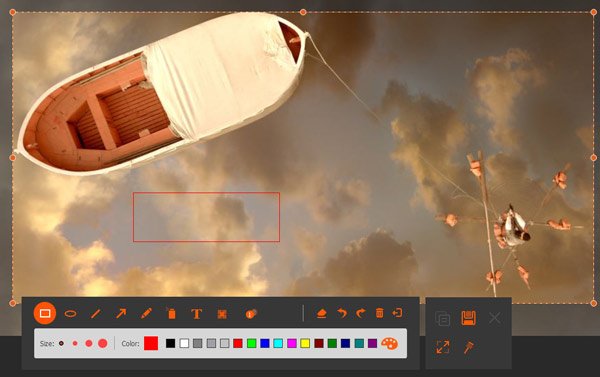
After screenshotting, you can edit and decide where the screenshot should go:
Add border, line, arrow and more: Choose the shape you need on the toolbar, select the size and color, and place it on the proper position. It is a good way to highlight something on screenshot.
Add text: Choose the big T button on the panel, customize the color, font, size and other options. Click on the desired position to add a text border and input some texts you want onto the screenshot.
Draw on screenshot: Pick the Pen button, select the size and color of it, and add free paintings on the screenshot.
Blur a subject: In order to protect privacy, you can choose the Blur button, adjust the degree and range, and select the target area to blur it.
Cancel editing: If you are not satisfied with the editing, use the Eraser button to remove it easily.
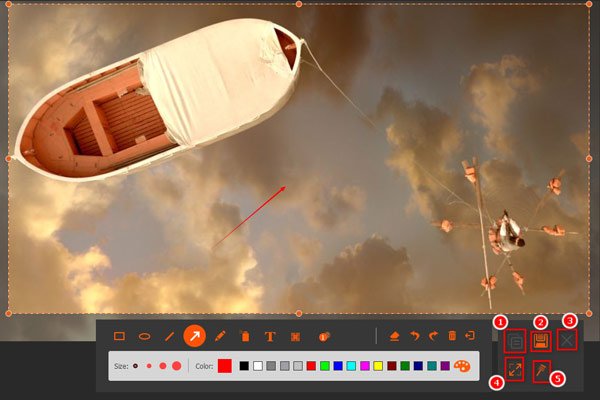
Step 3 Edit and save screenshot
When editing is done, locate the right panel on the toolbar and decide where is the screenshot saved. Firstly, you may want to preview the result by hitting the Enlarge button. If you wish to use the screenshot in another application, for example, click the Clipboard button and paste it to the target software. To save the screenshot to your hard drive, click on the Disk button. The screenshot tool also lets you pin to screen by hitting the Pin button.
Maybe you are also interested in taking screenshots in Windows Media Player.
Part 3: FAQs about Where Do Screenshot Go on PC/Mac
Why are my screenshots not being saved?
Firstly, if you just press Print Screen key, your screenshot will go to Clipboard but not saved in hard drive. You can paste it to any other programs, like MS Paint. To save your screenshots, press Windows + Print Screen together. Secondly, check your screenshot folder if you have changed it. Thirdly, run the built-in DISM tool to fix corruption error.
How do you take screenshots on laptops?
The Print Screen key is the easiest way to take screenshots on laptops. For example, you can take a screenshot of Google Maps by directly pressing the Print Screen key. However, it may be labeled as PrtScn, PRTSC, Ps/SR or other variants.
What is the PrtScn key?
The PrtScn key is used to take screenshots on your computer or laptop quickly. Moreover, it works with other keys to screenshots in various cases. The Windows + PrtScn combination will take a screenshot and save as an image. Alt + PrtScn will capture the current active window and send it to clipboard. Windows + Alt + PrtScn will screenshot active window as an image.
Conclusion
Now, you have learned where to find your screenshots on Windows and Mac. It cannot be denied that the built-in utilities and shortcuts are simple ways to screenshot your screen, though it is a bit complex to find the results. Apeaksoft Screen Recorder, on the other hand, lets you decide where to store your screenshots easily. If you still have other troubles on screenshot, please feel free to leave your message below.