How to Retrieve Deleted Notes from iCloud on iPhone
Accidentally deleting notes on your iPhone or iPad can be frustrating, especially if they contain important information. Thankfully, Apple provides a few methods to recover notes from iCloud if you have backed up your notes to Apple’s cloud storage automatically or manually. Our guide identifies the proven methods and demonstrates the workflows regardless of the cause, including accidental deletion, factory reset, software glitches, failed software update, and more.
PAGE CONTENT:
Part 1: How to Recover Recently Deleted Notes from iCloud
The easiest way to recover deleted notes from iCloud is the Recently Deleted folder. Once you delete a note, it will go to the Recently Deleted folder and be stored here for up to 30 days. Before they are permanently removed, you can recover them directly.
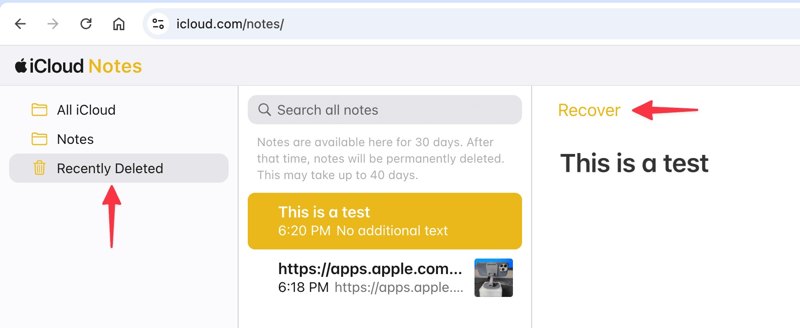
Step 1. Go to www.icloud.com/notes in a browser and sign in with your Apple account credentials. Or sign in to www.icloud.com and choose Notes.
Step 2. Choose the Recently Deleted folder on the sidebar.
Step 3. Here you can see all deleted notes. Select the notes you want to get back.
Step 4. Click the Recover button, and they will go to the original folder. Or you can select the desired notes and drag them to the target folder.
Part 2: How to Recover All Notes from iCloud on iPhone
If you sync notes to iCloud from your iPhone, you can get iCloud notes recovery before the change updates to your account. This method will download all notes from your iCloud account. However, you cannot use this method to recover deleted Notes on your main iPhone because when you delete them, they will also disappear in iCloud.

Step 1. Run the Settings app on your device.
Step 2. Tap on your profile.
Step 3. Choose iCloud and tap Notes.
Step 4. Toggle off Sync this iPhone.
Step 5. Then, toggle on Sync this iPhone. When prompted, download notes from iCloud to your iPhone.
Part 3: How to Recover Notes from iCloud Backup
If you cannot find the lost notes in iCloud’s Recently Deleted folder, try iCloud backup instead. Once you set up iCloud backup on your iPhone or iPad, you can restore notes to your device. The prerequisite is that you have an iCloud backup. Plus, you have to erase your device first.
Step 1. Run your Settings app.
Step 2. Navigate to General, and Transfer or Reset iPhone.
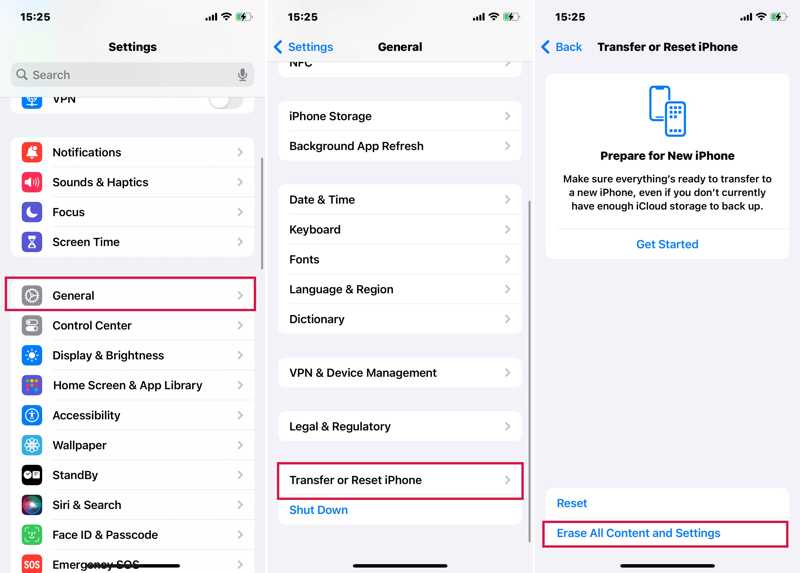
Step 3. Tap Erase All Content and Settings.
Step 4. If prompted, enter your iPhone passcode or Apple ID password.
Step 5. Read the message, tap Continue, and choose Erase iPhone or Erase iPad.
Step 6. Once your device restarts, set it up as a new device.
Step 7. Make sure to connect to a Wi-Fi network.
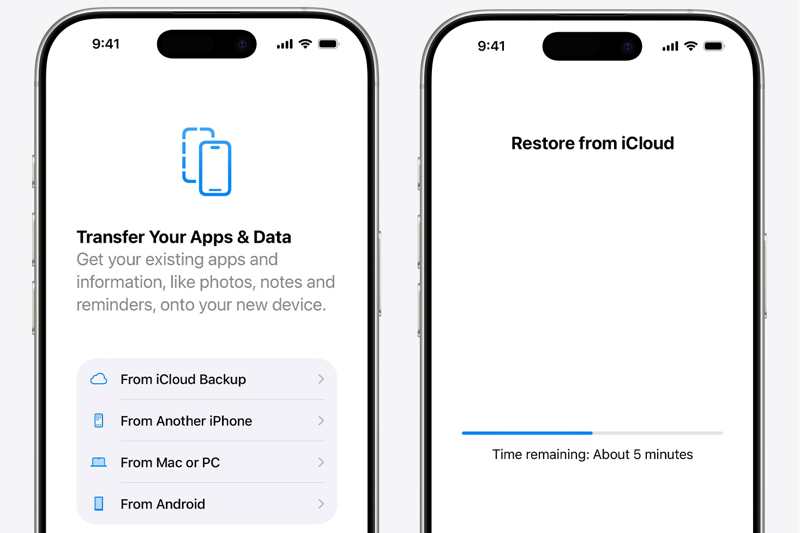
Step 8. Then, choose From iCloud Backup on the Apps & Data screen.
Step 9. Enter your Apple ID and password.
Step 10. Next, choose the backup file that contains the desired notes.
Step 11. After restoring notes on iPhone from iCloud, complete the setup.
Part 4: How to Recover Notes from iCloud Backup Without Reset
As mentioned previously, you have to erase all content and settings on your device to get notes back from iCloud backup. Fortunately, Apeaksoft iPhone Data Recovery can help you fix this problem. It is able to open iCloud backup files and extract specific notes without resetting your device.
The Easiest Way to Retrieve Deleted Notes from iCloud Without Resetting Your Device
- 1.Recover permanently deleted notes from iCloud backup.
- 2.Preview and selectively retrieve specific notes.
- 3.Retrieve notes and attachments in their original condition.
- 4.Available to a wide range of data types.
- 5.Compatible with the latest versions of iOS and iPadOS.
Secure Download
Secure Download

How to Recover Notes from iCloud Backup
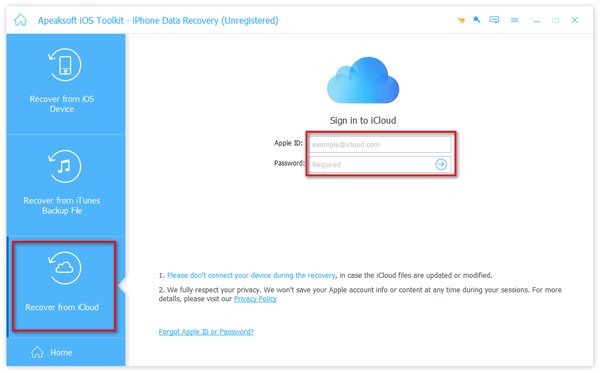
Step 1. Download iCloud backup
Download and install the best data recovery software on your PC. It works on Windows 11/10/8/7/XP/Vista. There is another version for Mac. Choose the Recover from iCloud Backup File tab on the sidebar. Enter your Apple ID and password. If 2FA is turned on, input the verification code that appears on your screen. Choose iCloud Backup, and download the right backup file.
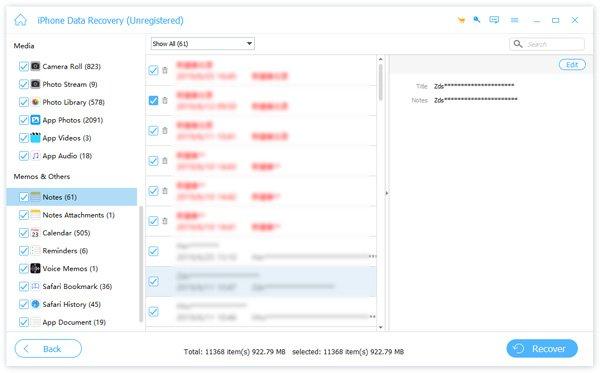
Step 2. Preview deleted notes
Check Notes and other data types you want to restore, and click the Next button. Wait for a while to extract notes and note attachments from iCloud backup. Then, you can view all iCloud notes and attachments. The Search bar enables you to locate specific notes quickly by keywords. You can also recover deleted contacts from your iPhone.
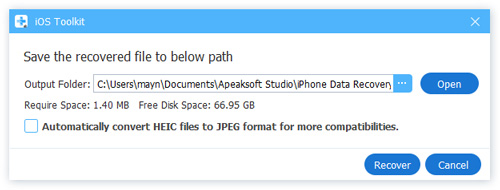
Step 3. Recover notes from iCloud
Select all notes that you want to restore and click the Recover button at the bottom right corner. Then, click the Open button and set an output folder. Finally, click the Recover button to save the lost notes. A few minutes later, you can find the deleted notes on your hard drive. Current data on your iPhone or iPad won’t be overwritten.
Conclusion
This guide explained how to recover disappeared notes from iCloud. You can download the sync notes from your iCloud account on your iPhone directly. Furthermore, you can find them in iCloud’s Recently Deleted folder. Or restore notes from iCloud backup. Apeaksoft iPhone Data Recovery allows you to extract notes from iCloud backup without resetting your device.
