Close
WinFree Download MacFree Download
Navigation

FAQs of Android Data Recovery

If you have some problems when using Android Data Recovery, find answers here from the FAQs list.

WindowsFree Download MacFree Download Play

My device connected, but cannot be detected?HOT

Method 1: If you meet this problem, you can change to another connection mode by clicking the drop-down list. And then reconnect your device to computer. There are three connection modes you can select, MTP, PTP and USB Mass Storage. You can select the connection mode according below introduction.

MTP: MTP stands for "Media Transfer Protocol." When Android uses this protocol, it appears to the computer as a "media device." The media transfer protocol was widely promoted as a standard protocol that is used to transfer audio files to digital music players by using Windows Media Player or the similar applications.

PTP: PTP stands for "Picture Transfer Protocol." When Android uses this protocol, it appears to the computer as a digital camera.

USB Mass Storage: USB mass storage is the usually used by hard drives, external, SD cards, flash drives and some other USB storage devices. The drive can make itself suitable to the computer.

Method 2: Make sure that USB Debug is enabled.

USB debugging is often used by developers or IT support people to connect and transfer data from an Android device to a computer. Usually, the setting is turned off. So, you need to enable this feature and let the software to get access to your Android phone.

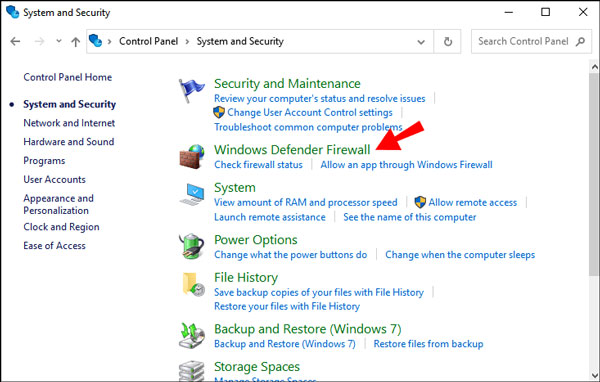
Method 3: To fix device cannot be detected issues, you also need to confirm if you have disabled AutoPlay on your Windows PC or not. If not, keep reading to have a try.

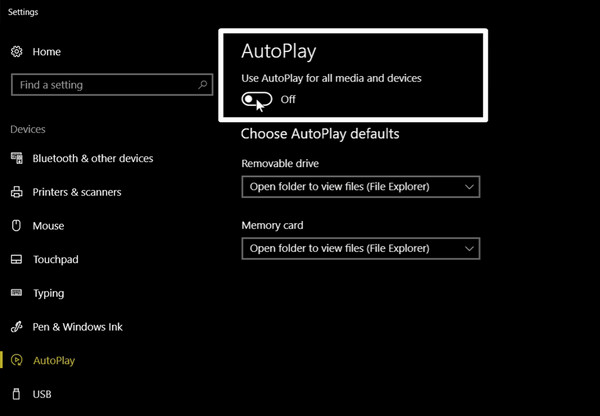
For Windows 10, find and click "Windows" icon at the lower left corner. Go to "Settings", and click on "AutoPlay" from the "Devices" option. Then, go to the left part of the window, and switch on "Off" under the "Use AutoPlay for all media and devices" option.

WIndows

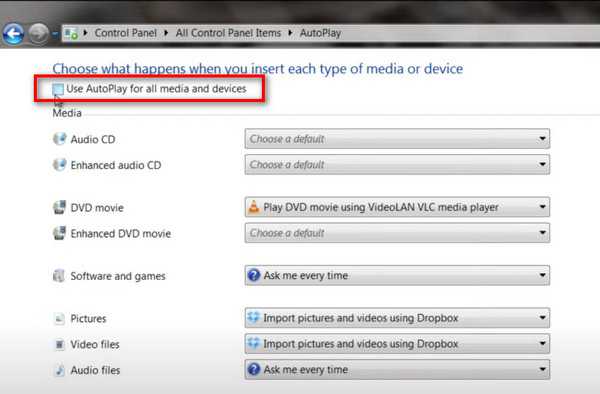
For windows 7, find the "Start" button and head to "Control Panel", hit on "Hardware and Sound", and find "AutoPlay". Please uncheck the box ahead of the "Use AutoPlay for all media and devices" option to disable AutoPlay.

Diasble

Method 4: If the above methods cannot solve your problem, maybe you can try below way.

a. Please confirm that the product you are using is the latest vision. (You can download from our official website: Android Data Recovery)

b. Confirm that the USB cable is no problem.

c. If it still has problem, please contact our customer service (support@apeaksoft.com).

Firstly: tell our customer support your detail problem and the type of your device.

Secondly: send your log to our customer support. You can click "Feedback" on the top right of our product, and then open feedback window to import email address and detailed content, finally click "Submit" to send the problem to our customer service.

Why do I need to open USB Debugging Mode?

a. USB Debugging Mode is related to the developing function provided by Android. With opening the function, users are able to copy and transfer data between computer and Android devices, install apps on Android phone, read log data, etc.

b. You need to turn it on manually as the USB Debugging Mode is off by default.

c. Only if you open the USB Debugging Mode can the wired connection be established.

How to enter USB Debugging Mode?

For Android 2.3 or earlier:
Find "Settings" on the device > Click "Application" > Click "Development" > Check "USB Debugging Mode".

For Android 3.0-4.1:
Find "Settings" on the device > Click "Developer Options" > Check "USB Debugging Mode".

For Android 4.2 or later:
Find "Settings" on the device > Find "Build Number" and tap it for 7 times continuously > Go back to "Settings" and click "Developer Options" > Check "USB Debugging Mode".

Click to know more about enabling USB Debugging on Android.

The Android phone needs to be authorized

There are some Android phones need to be authorized when being connected to computer. You can check "Always allow from this computer" on your device. If other operations lead to the prompt box disappears, you can disconnect the phone, and then try to connect again.

How to acquire permissions for scanning Android phone?

For some third software, you need to root the Android phone first, and then you are able to use the function of the software. After rooting, you can acquire the super permission to manage your phone, which is you are able to do any operations on your Android phone. After finishing rooting, a rooting management app will be installed on your phone. For different rooting tool, this App (Super User, Super SU, KingUser, etc.) is also different. But the function of these apps is the same. For example, FoneGo is one of the apps from our software. It will request the permission of your phone for scanning your deleted data on phone. At the moment, if the tip showing that the scanning process is failed, your phone may get to a default setting and it will reject the request from FoneGo. In this situation, you may need to acquire FoneGo permission to continue the following operations. Below are the details:

a. When you find Super User on your phone, open it, and then find FoneGo, and tab it. Then hit the icon on the right top to delete all log files.

b. If you find Super SU on your phone, you can open Super SU, and find FoneGo, hip Access -> Grant -> Save.

c. If you find KingUser on your phone, you can open it, and tab "Allow" from the drop-down menu.

How to handle Exception?

If you have open USB Debugging Mode, installed the driver successfully and trusted the device, but the Android phone still cannot be recognized, maybe you can try below ways:

1. Disconnect your phone to computer.

2. Open your Android phone, get to "Settings" > "Applications" > "Development", then uncheck the USB debugging mode, wait a few seconds, check it again.

3. Double connect your Android phone to computer.

4. If your Android phone still cannot be connected successfully by following above all operations, maybe you need to contact our service support: support@apeaksoft.com

How to install the device driver?

1. When connecting the device to the program, if there's no driver detected, there will be a pop-up prompt which reminds you to install the driver first. Click "Install".

2. If the driver has been installed successfully but it still fails to connect, please check whether the driver is disabled under "Device Manager". You can find the driver in "Computer" - "Properties" - "Device Manager" - "Android Phone".

Right click the certain node and check whether it is disabled. If it is, click "Enable" and the device will be connected to the computer successfully.

Click to know more about installing USB Driver for Android Device.

Why there are 6 different devices limitation? And what should I do?

For every device, there is a unique identification. When you connect your Android phone and recover files with our program, our program will record the unique identification of your phone.

Our program can only recover the data for your 6 different devices. For the same device, there is no limitation.

If you have reached the six device limitation and still want to use this software to recover more devices, you need to buy again.

For your second purchase, we can offer you 40% discount. You can contact our support team, and they will send you a special purchasing link. Or you can also purchase the Volume Licensing Service here.

FAQ: Android Data Recovery detects other mobile phone manager? How to deal with it?

How to Turn off Windows Defender Firewall?

There are three ways you can use to disable Windows Defender Firewall:

Way 1. Go to Control Panel

a. In the search box, you should search for "Control Panel" and open it, and then click "System and Security".

Click System and Security

b. Next, you need to select "Windows Defender Firewall".

Select Windows Defender Firewall

c. Then, you can select "Turn Windows Defender Firewall on or off" at the left panel of the window.

Select Turn on or Off

d. Finally, check two boxes of "Turn off Windows Defender Firewall" and click the "OK" button to disable Windows Defender Firewall.

Turn Off Defender

Way 2. Disable Windows Defender Firewall for Software

a. Go to "Settings", select the "Firewall & network protection" option, and then click "Allow an app through firewall".

b. After that, you can find the program you want to turn off Windows Defender Firewall and check its box.

Way 3. Use Command Prompt

Firstly, you should search for "Command Prompt" in the search box, then you can input the command which is "netsh advfirewall set allprofiles state off" to turn off Windows Defender Firewall.