4 Ultimate Ways to Take a Screenshot on Microsoft Surface Pro
Microsoft Surface Pro is a two-in-one office device launched by Microsoft. It can function as both a tablet computer and a laptop.
Whether you want to capture an error message or share content with others, knowing how to take a screenshot on a Microsoft Surface Pro is essential.
If you just need simple screenshots, you can use the default snipping tools, such as keyboard shortcuts, the Surface Pen, hardware buttons, and more. Of course, you can also take screenshots on a Surface Pro, as the article's professional suggests.
PAGE CONTENT:
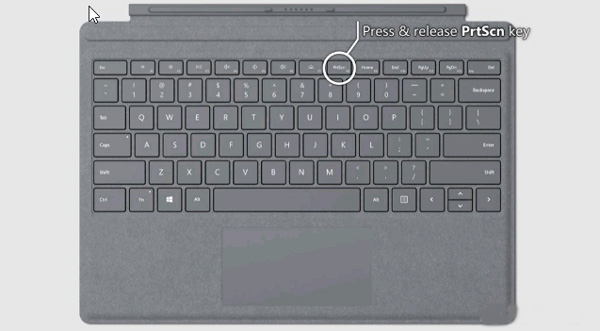
Part 1: Surface Pro Screenshot Shortcut (Keyboard Method)
You can just use the keyboard on the Surface Type Cover to take a screenshot on the Surface Pro when it's used as a laptop. Then you can follow the traditional method for taking screenshots on a Surface Pro with a keyboard as shown below.
Step 1. Press the PrtScn key, or Alt + PrtScn within the keyboard to take a screenshot on the Surface Pro directly.
Step 2. After that, you can paste the screenshot to Paint for further editing, Word, or social media apps accordingly.
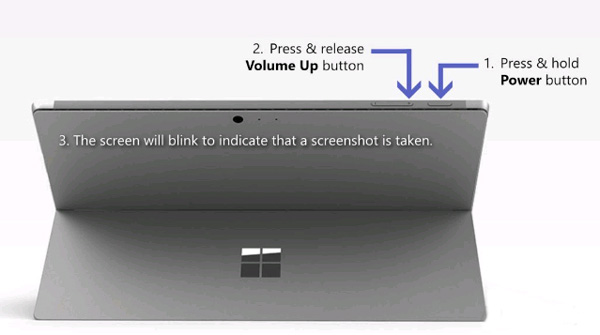
Part 2: How to Screenshot on Surface Pro Without Keyboard (Hardware Buttons)
If the type cover for your Surface Pro is unavailable at the moment, you can take a screenshot on the Surface Pro using the hardware buttons. Just learn more about the process by following the steps below.
Step 1. When you open the Microsoft Surface Pro, press and hold the Power button.
Step 2. Then press and release the Volume Up button while holding down the Power button.
Step 3. All screenshots will be saved in a folder named Screenshots under the Pictures library. (See where screenshots go)
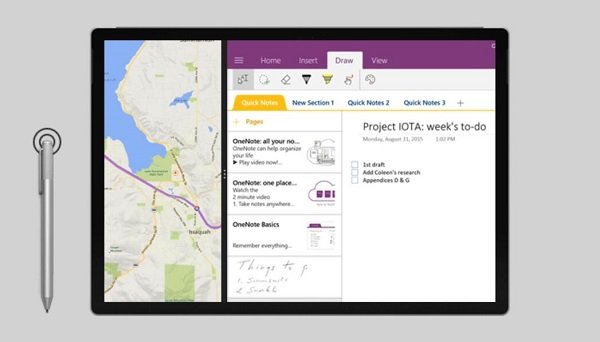
Part 3: How to Screenshot on Surface Pro with Surface Pen
Another method to take a screenshot on a Microsoft Surface Pro is the Surface Pen. It enables you to take a screenshot with the new Screen Sketch feature using the following process with ease.
Step 1. Double-click the Eraser button on the top of your Surface Pen. You can also select a region and press the eraser button to take a screenshot of that region on the Surface Pro.
Step 2. After that, you can edit, crop, and save the screenshot by clicking the Save as button in the top-right corner of the screen. Moreover, you can also share the screenshot directly to OneNote.
Part 4: Best Way to Screenshot on Surface Pro with Editing Tools
Whether you need to capture screenshots or screencasts, or edit and manage photos with ease, Apeaksoft Screen Recorder is a versatile screen recorder for Microsoft Surface Pro. It enables you to tweak the video and audio settings, add annotations/mouse cursor/watermark, and even edit the recording with ease.
Best Screenshot Tool for Surface Pro
- Capture your screen exactly the way you want - Take screenshots for full screen, a certain window, and a part of the screen.
- Add annotations, watermarks, shapes, texts, arrows, callouts, and more elements to the screenshot as you like.
- Manage and edit recordings in the built-in media library with ease.
Secure Download
Secure Download

How to Take Professional Screenshots on Surface Pro
Step 1. Download and install the screenshot tool. You can launch the program on your computer. After that, you can choose the Screen Capture option to capture a snapshot as needed.
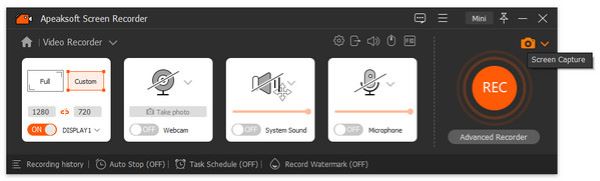
Step 2. After that, you can select the desired area with the external mouse on your Surface Pro, choosing a specific window, full-screen mode, or even customizing the capture area.

Step 3. It also lets you draw a border, add an airbrush/mouse cursor, or apply a blur effect to the screenshot. You can also easily customize the size and color of the text and fonts.
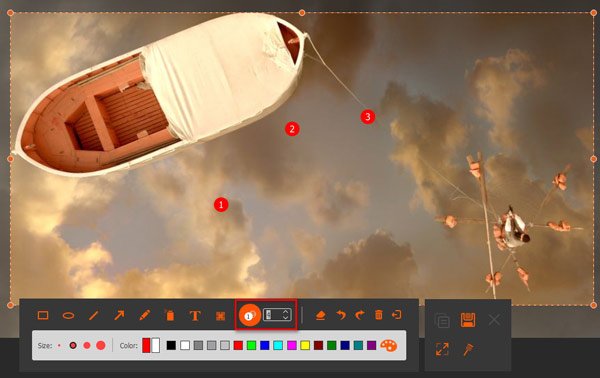
Step 4. Click the Disk button to save a screenshot on Surface Pro. It will pop up a window for you to select the save path before further editing the photos within the program.

Part 5: FAQs About How to Screenshot on Surface Pro
How to Screenshot on Surface Pro 3 or Earlier?
Press and hold the Windows logo key and the Volume Down key simultaneously. When the screen flashes, your screenshot will be captured. It is saved in the Screenshots subfolder in Pictures on your tablet automatically.
Why can't I take screenshots on a Surface Pro?
Make sure your keyboard is connected and working properly. Try restarting the device or using the hardware buttons if it is still not working.
Is There a Default Snipping Tool for Screenshotting on a Surface Pro?
Besides the above methods, you can also use the same snipping tools on Windows PCs to take screenshots on a Surface Pro, such as Windows Snipping Tool and Snip & Sketch. (Find snipping tool for Mac here)
Conclusion
If you need to take a screenshot on a Surface Pro, you can learn the 4 best methods from the article. If you want to add an annotation, edit a screenshot, or manage screenshots, Apeaksoft Screen Recorder is the solution you should consider.
Related Articles
Want to capture images from Windows Media Player? This article provides the easiest ways to capture still images on that program.
If you accidentally deleted screenshots, here you can learn how to retrieve screenshots on Mac, PC, iPhone, or Android devices.
Microsoft Screen Recorder can capture screens on Windows computers. This article introduces its features, usage methods, and an alternative on Windows and Mac.
This article shows how to screenshot on a Toshiba laptop step by step. Follow these 3 different choices to screenshot on laptop on Windows.
