User Guide
- Getting Started
- User Interface
- Create Quick Slideshow with Themes
- Make Slideshow with Text
- Make Slideshow with Transitions
- Make Slideshow with Filters
- Make Slideshow with Elements
- Export Slideshow
Try It Now!
Getting Started
Install Software
For installing the software, you should check if your computer meets the following requirements.
Windows OS: Windows 7/Windows 8/Windows 10/Windows 11 (64/32 bit OS)
CPU: At least dual-core CPU, clocked at 2.0GHz above, memory at least 4G
RAM: 1G RAM or more
Processor: Intel i3 or better multicore processor, 2GHz or above
Graphics card: NVIDIA GeForce 8 and above. Or AMD HD 3800 and above
Sound card: is indispensable
Internet: Internet connection is necessary for accessing to online materials.
Then just free download this .exe file to your computer. Double-click it to start the installation process. Follow the on-screen instructions to select the language, location, etc. to install and run it on your computer.
Order Software
You can purchase Slideshow Maker online by visiting this page.
Alternatively, if you have already downloaded this software on your computer and installed it, just click the buy button ( ) on the upper right corner of the main user interface.
After the purchase is complete, your purchase email address will receive the registration code.
Register Software
Apeaksoft supports free trial version of Slideshow Maker.
Free trial version provides you with the limited features. For enjoying this software with full functions, you need to purchase and register it in the following 2 ways.
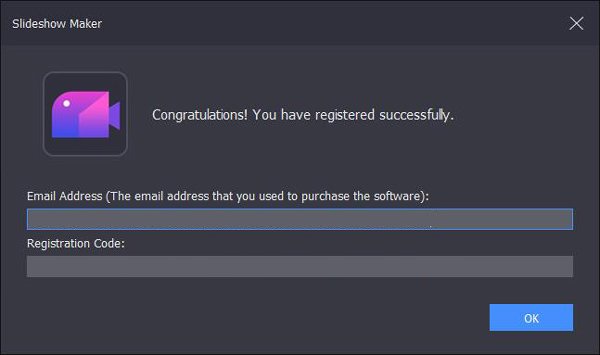
1. When you start the program for the first time each day, the register window will pop up automatically. You just need to type the email address and received registration code to activate it.
2. Do not see the registration window? Click Register on the upper right corner of the main interface to open the registration window, type in the email address and registration code and click OK to complete the registration of Apeaksoft Slideshow Maker.
Email Address: The email address that you use to purchase this software.
Registration Code: A string of characters marked as Activation key, license code or KEYCODE(S) in the order confirmation letter you received after the successful purchase.
Update Software
Apeaksoft Slideshow Maker always keeps it up to date. You can update this software automatically once or manually.
Update Slideshow Maker manually
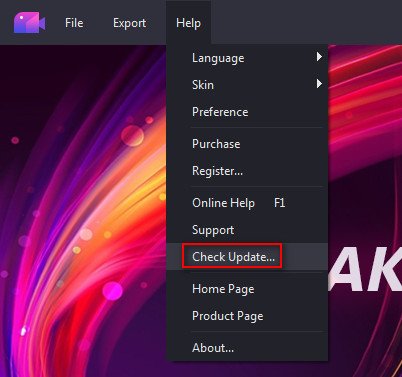
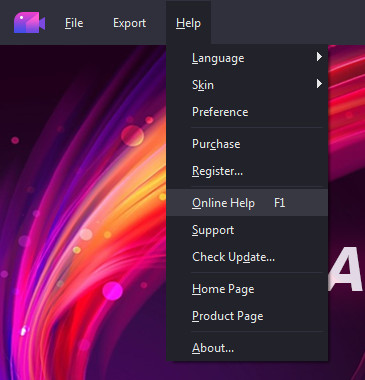
Run Slideshow Maker, in the main interface, click the menu button or Help and find Check Update… from the dropdown list.
Update Slideshow Maker automatically
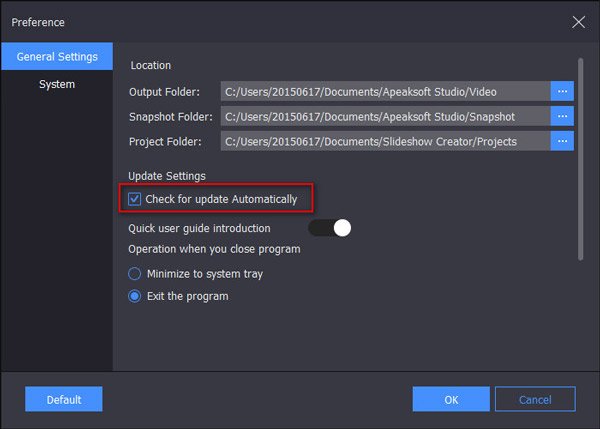
If you will not want to miss the fantastic updates every time, just enable Check for Update Automatically option by clicking Help > Preferences > General Settings.
Then it will send you the notification once you launch this software every day.
Apeaksoft Support
Apeaksoft provides you with the technical support via online help guide or just contact the support team.
Under Help dropdown list, you can click Online Help or press F1 to visit the online help page. Or click Help > Support to navigate the support team contact information.
Email to Apeaksoft Support anytime at support@apeaksoft.com
User Interface
This slideshow creator has powerful editing features and customized functions. Check the buttons and options to see how it works.
Main Interface
1 Preview option: You could play last/next frame, play or stop the slideshow effects preview.
2 Add Files: Click it to add more media files into this software.
3 Delete: Once clicking and selecting the item, and click Delete to remove the selected item from your slideshow.
4 Edit: After selecting one item, and click the Edit button to start to edit the photo or video.
5 Snapshot: Take a snapshot while previewing the effects.
6 Volume: Adjust the background music volume of the slideshow presentations while previewing.
7 Full screen: Click it to preview the slideshow effects in full screen.
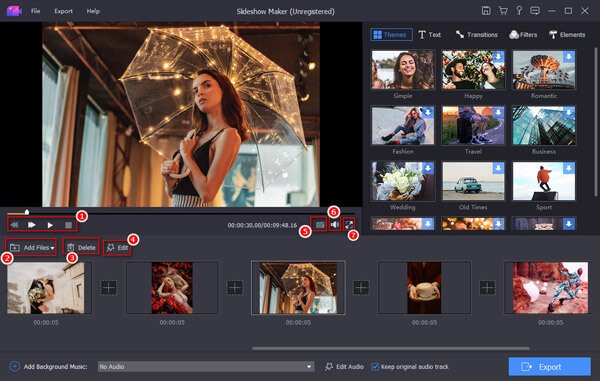
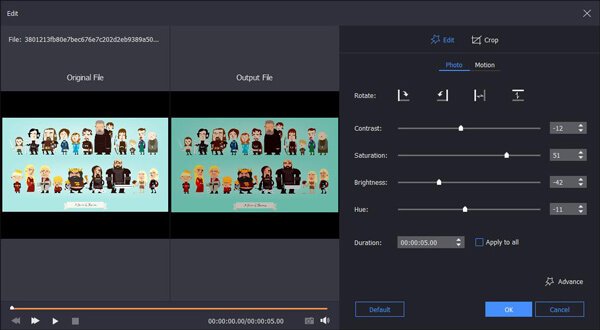
Photo Editing Interface
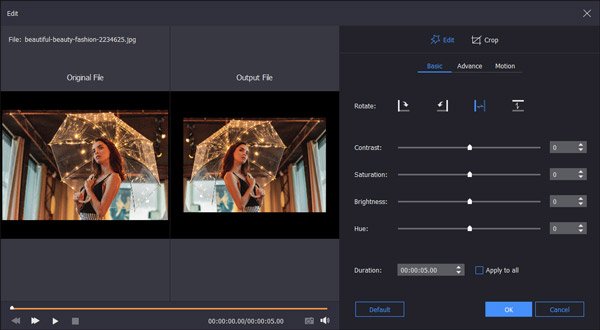
While you select the photo you want to edit, just click the Edit button, and you will see the interface of photo editing.
Basic: In the Basic tab, you will see you could rotate or flip the picture. Besides, the contrast, saturation, brightness and hue adjustment are also available for you. Do not forget the set the duration time of this photo, and you can also apply the duration to all items added into this software.
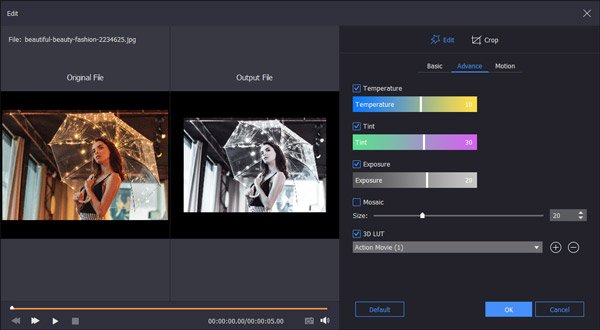
Advance: While you go to Advance tab, you will find the temperature, tint, exposure, mosaic, and 3D LUT options are for the photo settings.
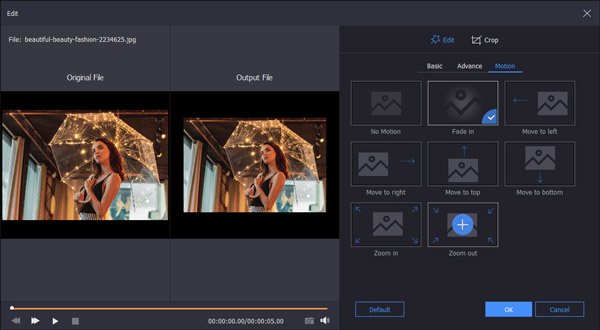
Motion: Motion option has provided you with 8 types of to show the picture, like fade in, zoom out, etc.
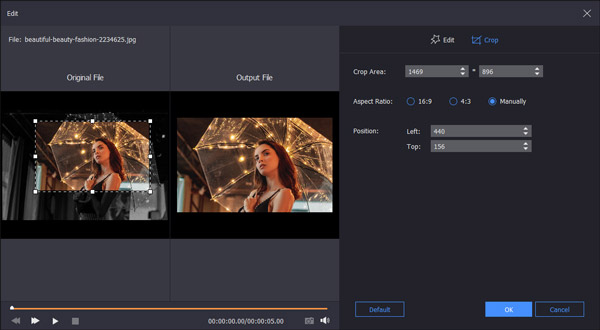
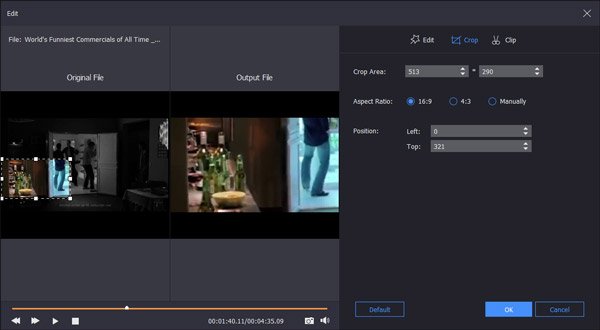
Crop: Back to the Crop tab at the top, you could adjust the aspect, crop area and position to get unwanted part of the photo freely.
Video editing interface
While you select the video file that you want to edit, click the Edit button, and you will see the editing features below.
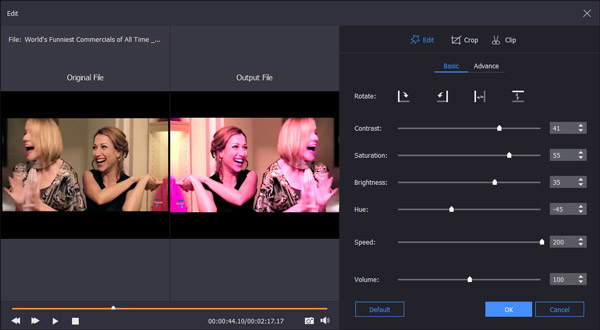
Edit video (Basic): Here, you are able to use the basic editing feature to flip or rotate video file, adjust contrast, saturation, hue and brightness. For the playback, it supports fast motion, and adjusts volume.
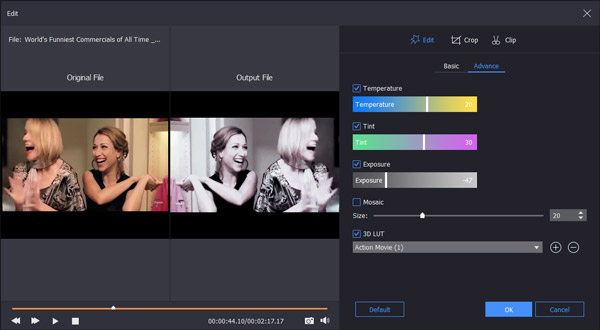
Edit video (Advance): Similar to photo editing, here you are able to adjust the video temperature, tint, exposure, mosaic and 3D LUT.
Crop video: Switch to the Crop tab, you could adjust the crop area, position and aspect ratio to get rid of the letterbox.
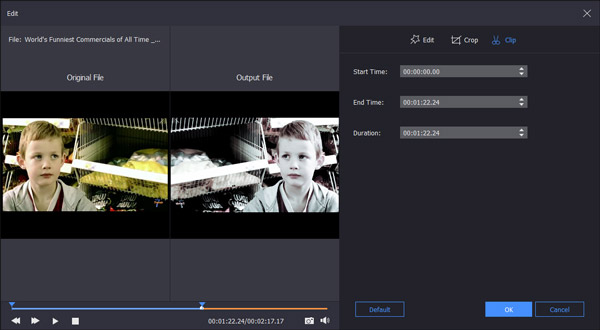
Clip video: Do not want the whole video? Just use the Clip feature to cut the unwanted parts by dragging the processing bar or adjust the value.
Audio Interface
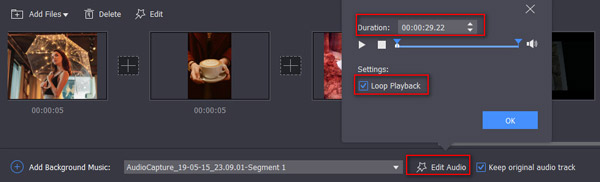
After you add a music file for your slideshow, just click the Edit audio option at the bottom, and you can set the audio duration, and loop playback mode.
For the option of Keep original audio track means you could keep not the background audio of your imported video and the added music file.
Create Quick Slideshow with Themes
Though Slideshow Maker provides you with various customizable settings, you are able to create a quick slideshow in 6 steps.
Step 1. Add Files
Launch this powerful Slideshow creating software on your computer. When you enter the main interface, you can click Add photo(s) and video(s) here to load pictures or other files to this Slideshow Maker.
Step 2. Edit picture
Choose specific picture or video that you want to edit, and then click Edit button to start the editing process. Here you are allowed to adjust image effects, crop video/picture and more.
Step 3. Add background music
You can freely change or add the slideshow background music by clicking the Add Background Music. You can also set the background music loop playback easily.

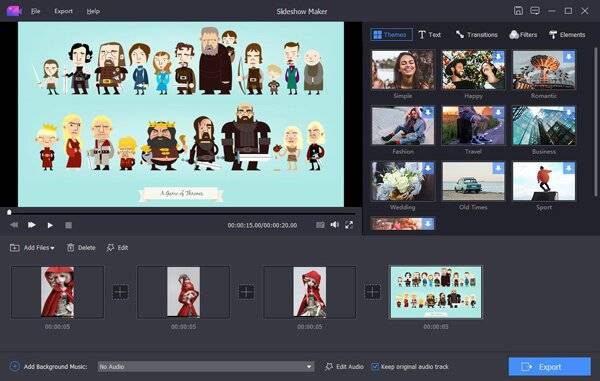
Step 4. Select slideshow theme
Slideshow Maker offers 10 frequently-used slideshow themes for you to choose from, such as Happy, Romantic, Fashion, Travel, Wedding, Christmas, Sport and so on. You can pick your preferred one or try them one by one until you find the suitable theme.
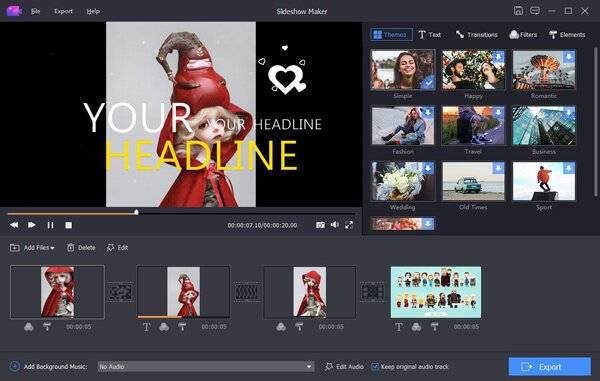
Step 5. Customize slideshow effects
This powerful slideshow making software offers you other options to customize your own slideshow theme. You can handily adjust the Text, Transition, Filter and Element to fit your need.
Step 6. Export created slideshow
As you can see, this all-featured slideshow creator tool gives you all types of options and settings to make sure you make a slideshow you really like. After that, you can click Export to pick the suitable output format and resolution. Almost all popular formats and devices are supported.
Make Slideshow with Text
If you want to personalize your slideshow presentations, you should avoid the ready-made themes, but customize the slideshow with the provided points.
No matter which feature you need, you should add the photos or videos firstly into this software.
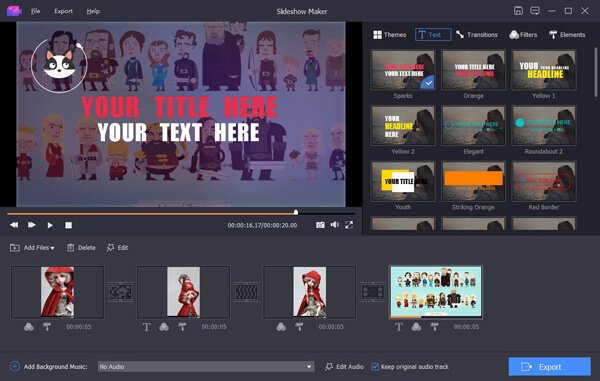
Now, let’s use the first customized features, Text.
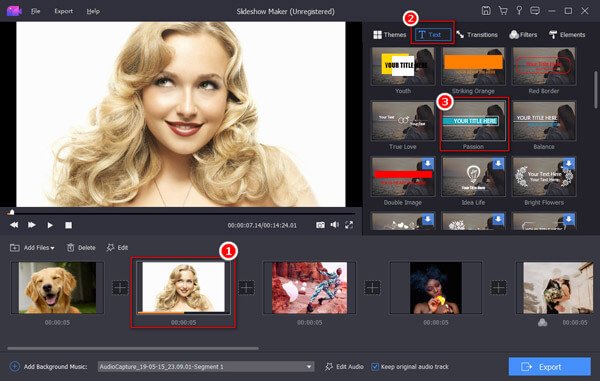
Step 1. Add text to photo
Click the item that you want to apply the Text effect. Switch to Text tab on the right window, and click the Text effect you want to add.
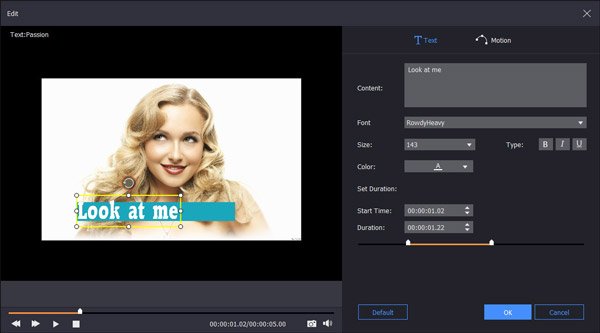
Step 2. Edit text effects
Click the T image under the item, and then you will be popped up into the text editing interface, where you are able to type the content, set font, color, size, title duration time, etc. Click OK to confirm and apply the changes you made.
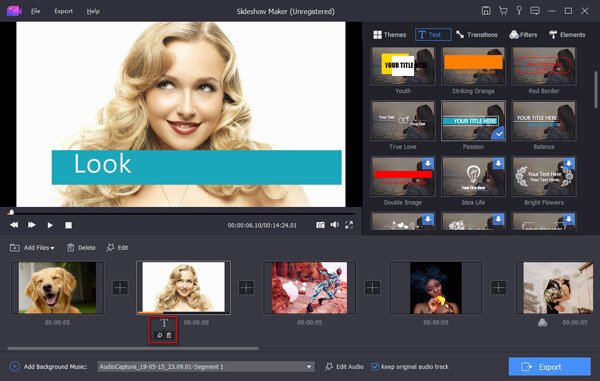
Step 3. Change or delete text effects
Want to change into another one text effect, just click another one effect directly. If you want to change the title effects or want to delete it, just click the T image under the item to select delete or edit it further.
Make Slideshow with Transitions
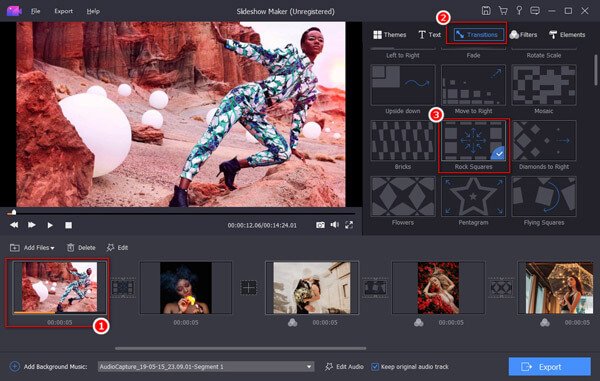
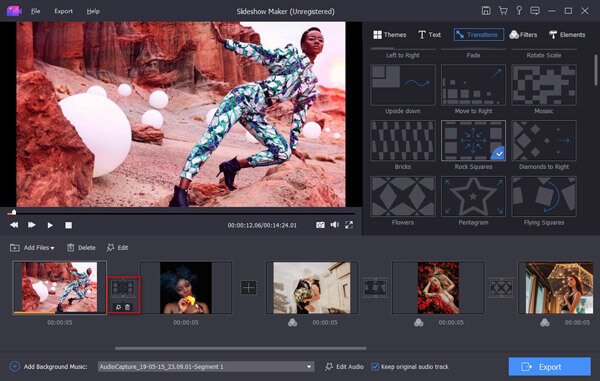
Step 1. Add transition effects to the item
Click the item after which you want to add the transition effect. Switch to Transitions tab on the right window, and click the Transition effect you want to add.
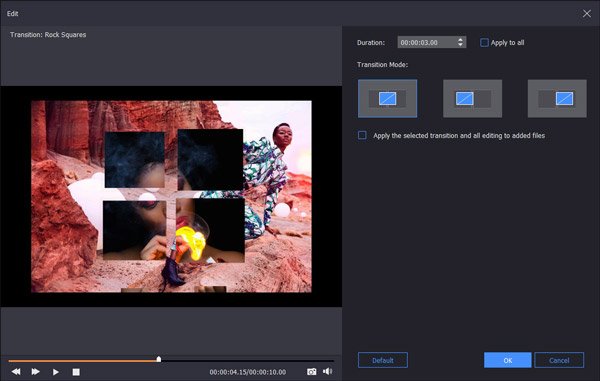
Step 2. Edit transition effects
Click the transition image after the item to the transition interface, you are able to set the transition duration time and mode. Click OK to confirm and apply the changes you made.
You are able to apply the transition effects to all the items.
Step 3. Change or delete transition effects
If you want to change the transition effects just click another one transition effect. For changing or deleting it, just click the transition image after the item to select delete or edit it further.
Make Slideshow with Filters
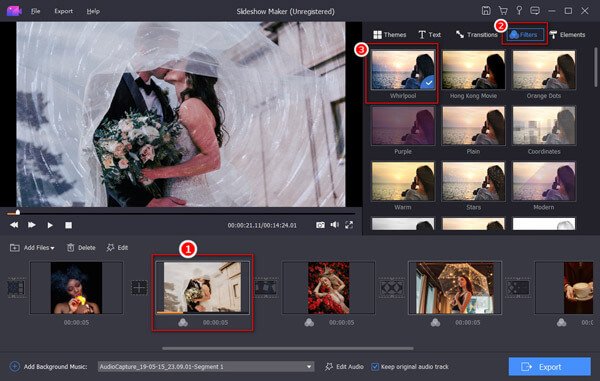
Step 1. Add filters to the item
Click the item to which you want to add the filter effect. Switch to Filters tab on the right window, and click the filter effect you want to apply.
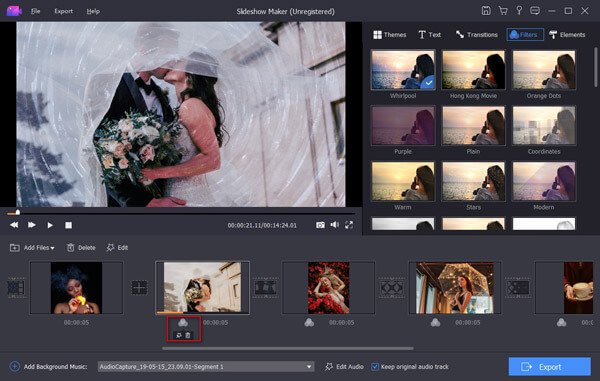
Step 2. Edit filter effects
Find the edit option by clicking the filter image under the selected item, and then you are only given the option to apply the filter effects to all items or just this one. Click OK to confirm and apply the changes you made.
You are able to apply the transition effects to all the items.

Step 3. Change or delete filter effects
For changing the filter effect, you just need to click another one filter effect. For deleting the filter, you just need to find the delete button from the popup by clicking the filter image under the selected item
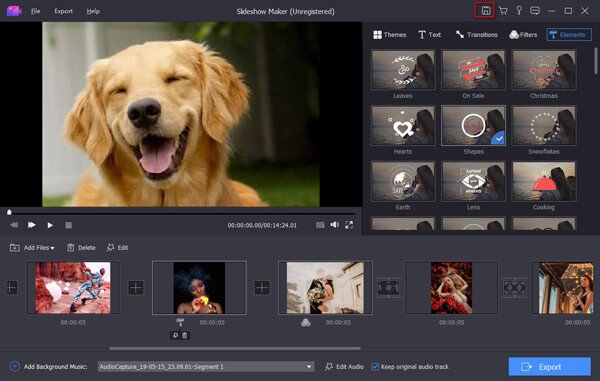
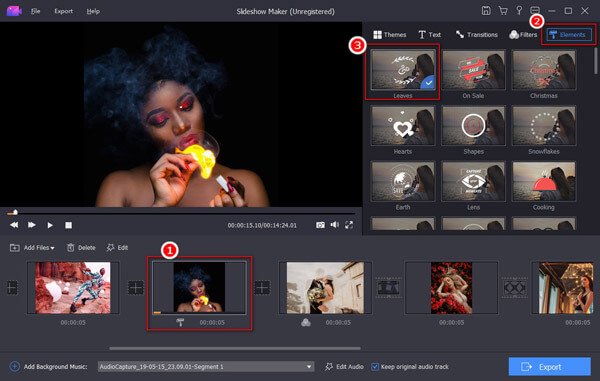
Make Slideshow with Elements
Step 1. Add transition effects to the item
Click the item after which you want to add the element effect. Switch to Elements tab on the right window, and click the Element effect you want to add.
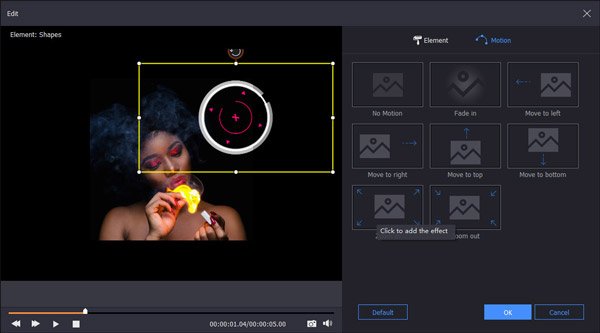
Step 2. Edit element effects
Click the Edit button after clicking the element image under the item to start to edit the element effects. You are able to set the element duration, and motion mode.
Click OK to confirm and apply the changes you made.
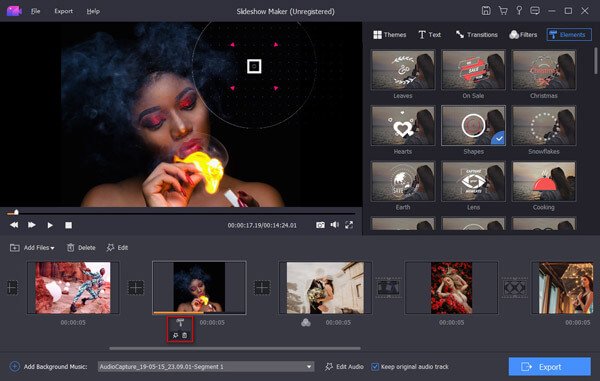
Step 3. Change or delete transition effects
Want to change another one element effect, just click the element directly.
For changing the effect you made just now, you need to find the edit button again. For element removal, just click the Delete button after clicking the element image under the item.
Export Slideshow
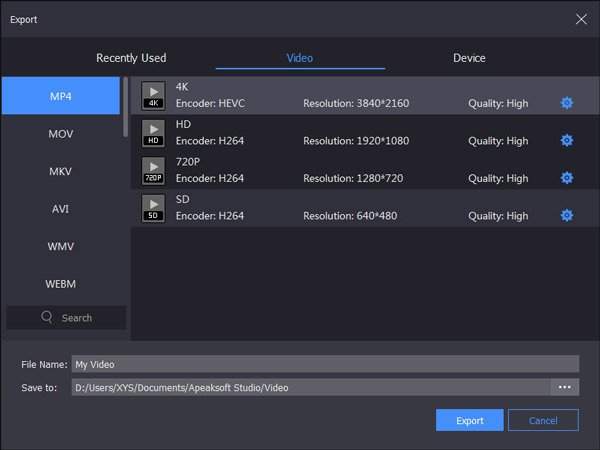
After making all settings prepared, click Export to select the output format.
Here you are able to select the video format from the left list. Or just select the device where you want to play the slideshow.
The setting option next to the quality will enable you to select the video encodec, frame rate, bitrate, resolution, audio channel, sample rate, etc. in details.

After all things are done, click Export to save the slideshow as the video file.
Surely, if you want to edit the slideshow in future, it also provides you with the option of saving as project. Back to the main interface, click Save Project (The first option on the right top corner).