
User Guide
- Getting Started
- Quick Start
- Rotate Video
- Crop Video
- Add Effect
- Basic Clip
- Advanced Clip
- Enhance Video
- Join Video/Audio
- Add Watermark
Try It Now!
Getting Started
Install software
Before installing this software, you should make sure that your computer meets the following requirements:
For Windows users:
Windows OS: Windows 11, Windows 10, Windows 8.1, Windows 8, Windows 7, Windows Vista, Windows XP (SP2 or later)
CPU: 1GHz Intel/AMD CPU or above
RAM: 1G RAM or more
For Mac users:
Mac OS: macOS 10.11 and above (including macOS 26/27 Golden Gate Beta)
CPU: 1.4GHz dual-core Intel Core i5 or above and Apple M1/M2/M3 chip
RAM: 1GB system memory
Hard Disk Space: 2GB hard drive space
How to Install Video Editor on Your PC
Step 1. Click the Free Download button on the top banner of this interface to access Apeaksoft Video Editor, according to your computer model. Then double-click the downloaded .exe file.
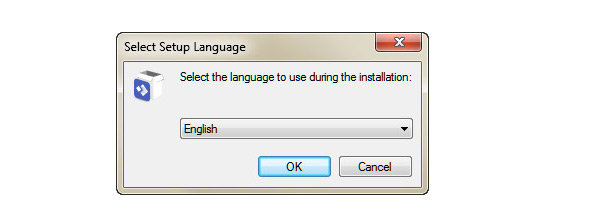
Step 2. Select the setup language and click the OK button. Then follow the instructions and click Next to continue the setup.
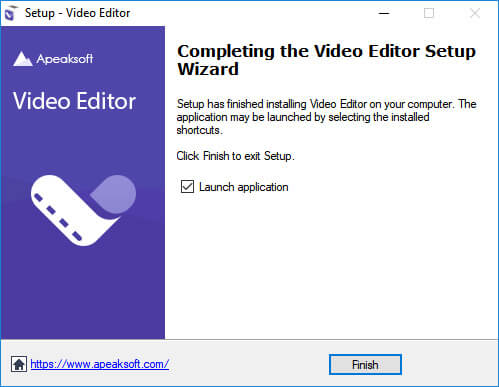
Step 3. Go through the License Agreement and tick the I accept the agreement option. Then click the Next button, choose a folder for your installation and go on with Next and Install button. You can click the Finish to exit the Setup after the installation.
Launch software
Reach Apeaksoft Video Editor on your desktop by double-clicking the button.

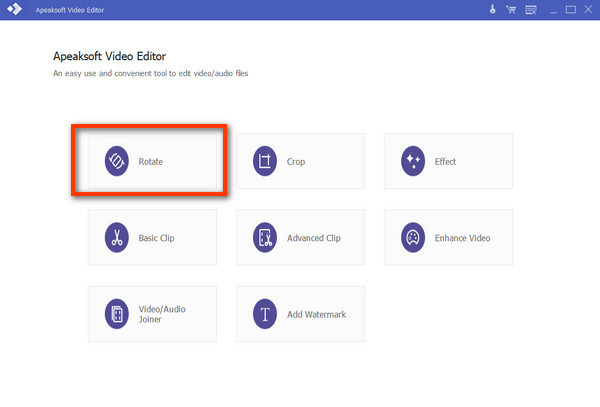
User interface
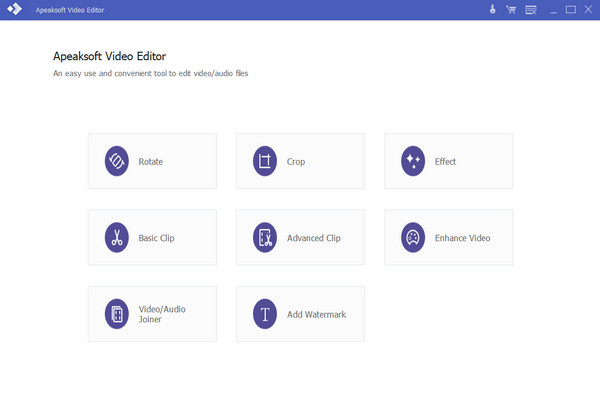
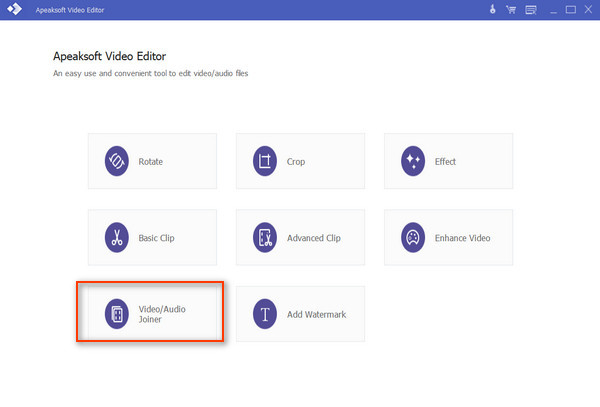
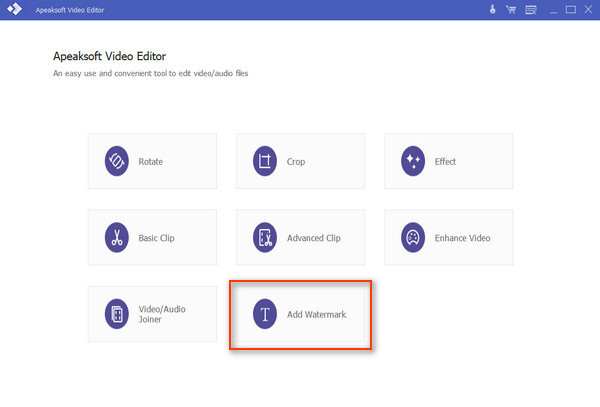
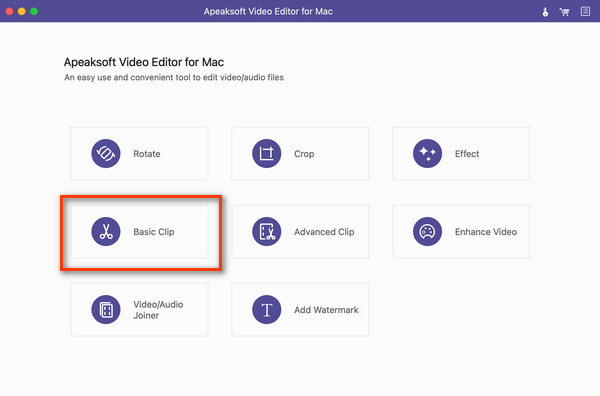
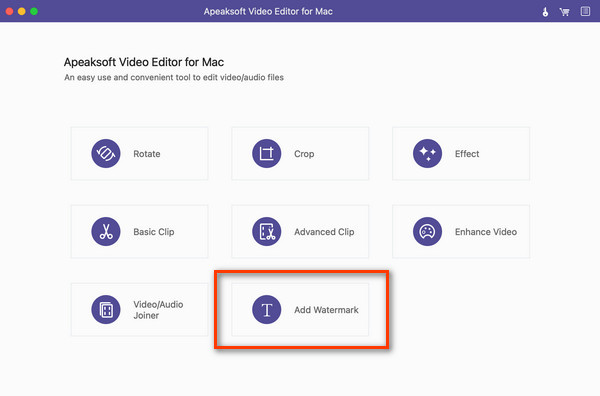
After launching Apeaksoft Video Editor, you can enjoy the intuitive and simple user interface. All the tools for video editing and enhancing are available for use, including Rotate, Crop, Effect, Basic Clip, Advanced Clip, Enhance Video, Video/Audio Joiner, and Add Watermark.
Language
You can change the default language on the Menu button and select among the 4 options: Dutch, English, French and Japanese.

Order software
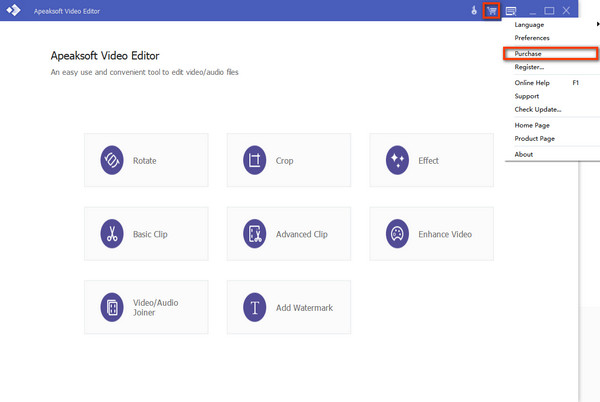
You can purchase the full version of Apeaksoft Video Editor to get free update and technical support. You can open the Purchase button to view the subscription plan for your Windows or open the Menu button and enter the Purchase section.
After you purchase the product successfully, you can receive the registration code within the email.
Register software
You can enjoy the free trial version of Apeaksoft Video Editor for up to 30 days. But to use the full functions and high quality, you are suggested to purchase this software and register.
Step 1. Click the Register button on the top menu in the main interface.
Step 2. Input your email address and the registration code you receive when purchasing this software (Click the Purchase button at the bottom if you don’t have one). Then click the Register button to complete the registration.
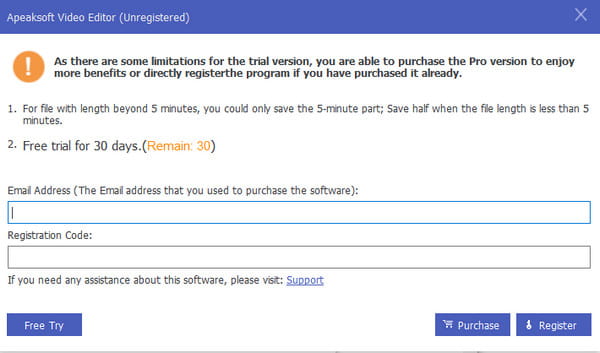
Now you are guaranteed full access to all functions to this video editor.
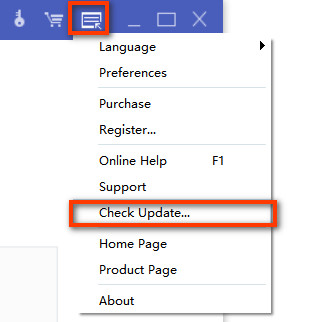
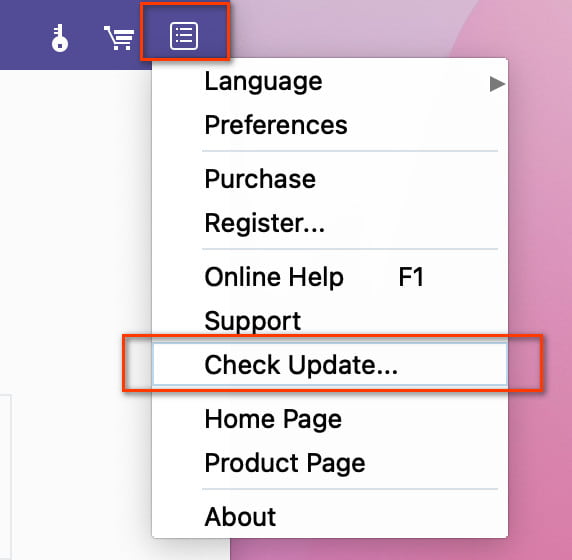
Update software
You can get the latest update from the Menu button to land on the Check Update section. Please ensure your Windows PC is connected to the network.
Apeaksoft support
Apeaksoft provides you with professional solutions in case you encounter any problems when using our product.
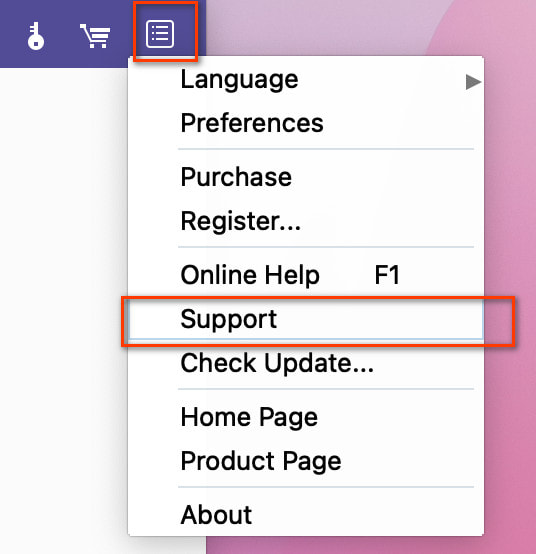
Channel 1. Visit our Support Center and ask any questions.
Channel 2. Click the Menu button on the top right corner and reach the Support section.
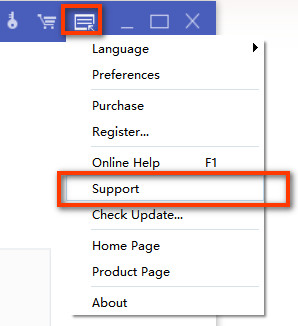
Channel 3. Email us at support@apeaksoft.com.
Quick Start
Apeaksoft Video Editor is a comprehensive and powerful video editing tool on PC to rotate, crop, clip, add watermarks and effects as well as convert video/audio files.
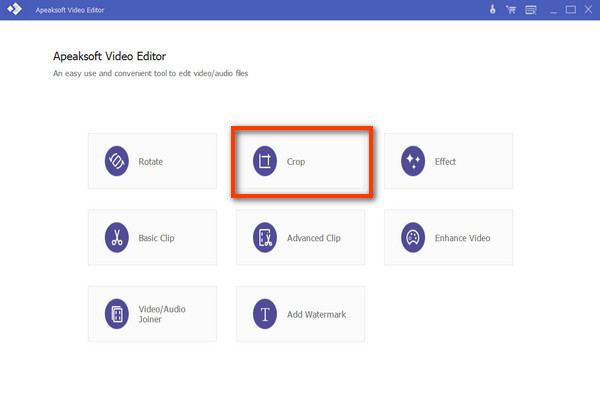
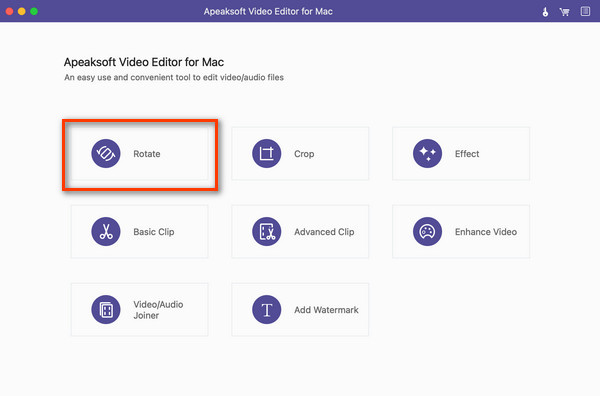
Step 1. Choose an Ideal Editing Feature
Select the ideal feature to edit or enhance your video in the main interface. You can choose among: Rotate, Crop, Effect, Basic Clip, Advanced Clip, Enhance Video, Video/Audio Joiner and Add Watermark.
Step 2. Add a File
Click the Add File button to input your program. Or you can drag and drop the target video or audio to the main interface.

Step 3. Edit the Video
Edit and enhance your video file based on your needs. Then you can change the output format and customize the settings on the video and audio. Select the destination and click the Save button to start the conversion.
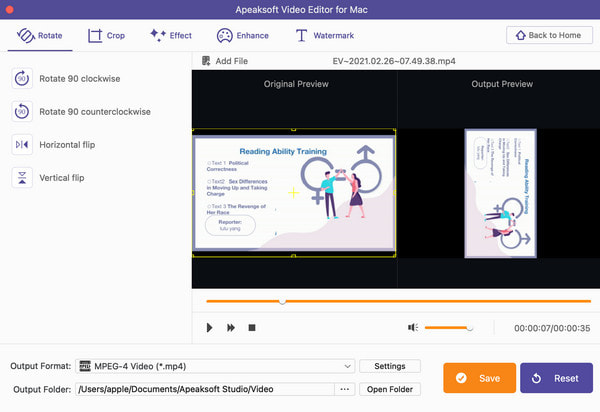
Rotate Video
The Rotate function enables you to change the video direction in 90 clockwise or 90 counterclockwise. Besides, you can flip the video horizontally or vertically.
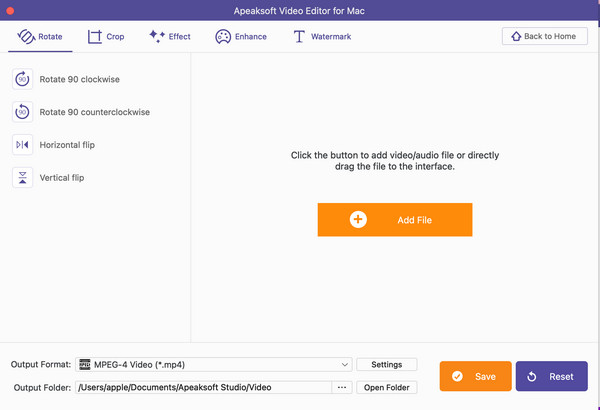
Step 1. Enter the Rotate feature
Launch Apeaksoft Video Editor and choose Rotate in the main interface.
Step 2. Add File
Click Add File to add your video/audio files to this program. Or you can drag the file to the interface directly.
Step 3. Rotate Your Video
In the Rotate section, you can choose to rotate your video 90 clockwise, 90 counterclockwise, horizontally or vertically with the options in the left list. Preview the effect on the right whenever you want.
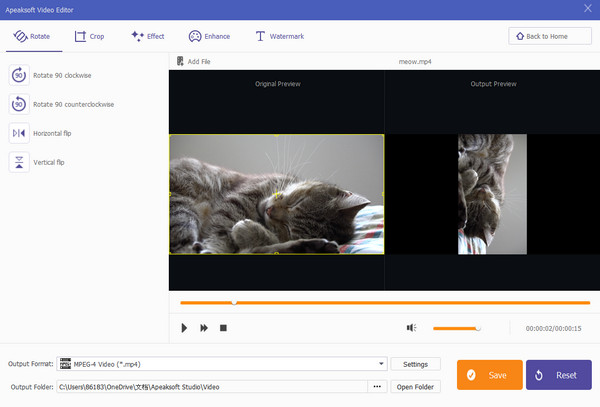
Step 4. Save Your Video
Change the format, custom settings and the destination for output. Then click the Save button to generate the works.
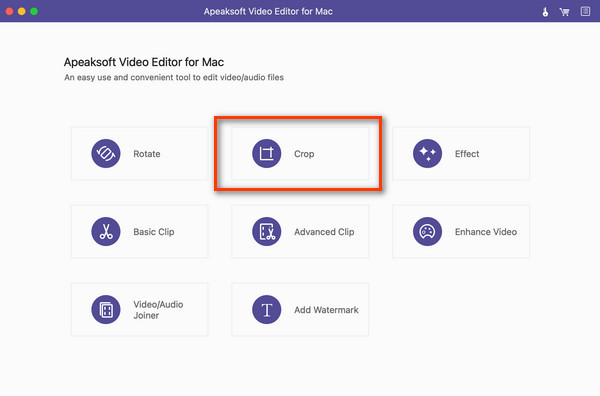
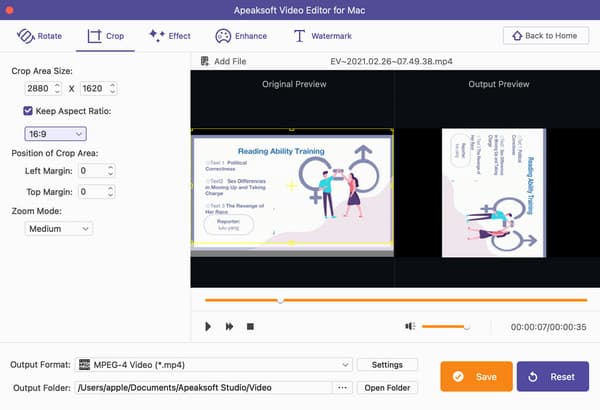
Crop Video
This video editor allows you to crop and resize your video. When you want to remove the letterbox for your favorite video, you can choose this Crop feature.
Step 1. Enter the Crop feature
Launch Apeaksoft Video Editor and choose Crop in the main interface.
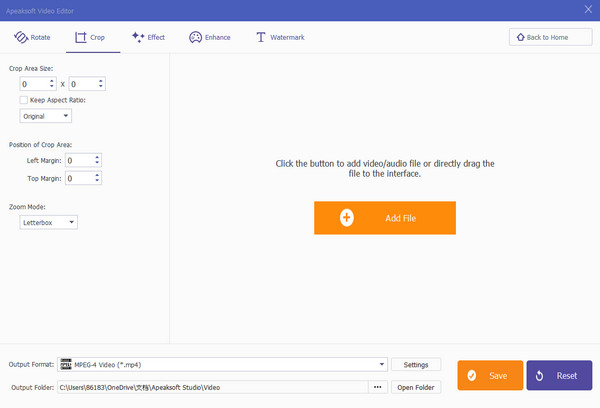
Step 2. Add Files
Click Add File to add your video/audio files to this program. Or you can drag the file to the interface directly.
Step 3. Crop Your Video
In the Crop section, you can change the crop area size and customize the aspect ratio with your needs or classic match like 16:9 and 4:3. You are free to adjust the position of the crop area accurately and select the zoom mode among Letterbox, Medium, Pan& Scan and Full.
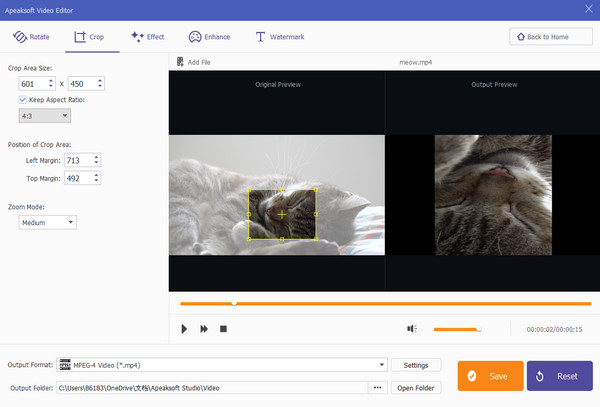
Step 4. Save Your Video
Change the format, custom settings and the destination for output. Then click the Save button to generate the works.
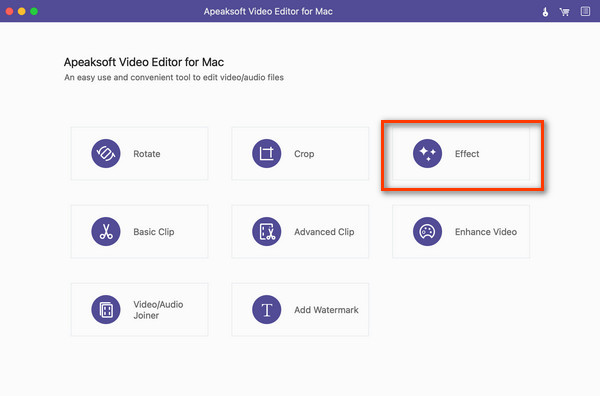
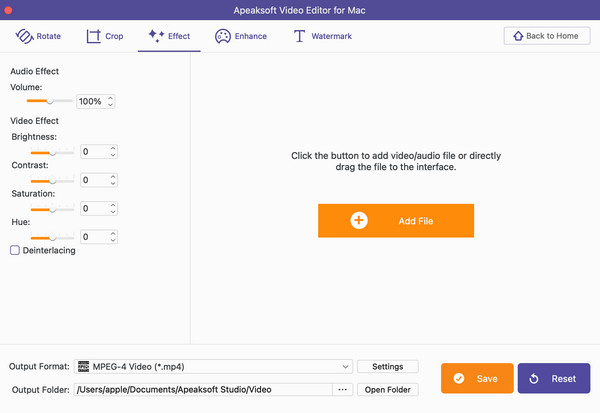
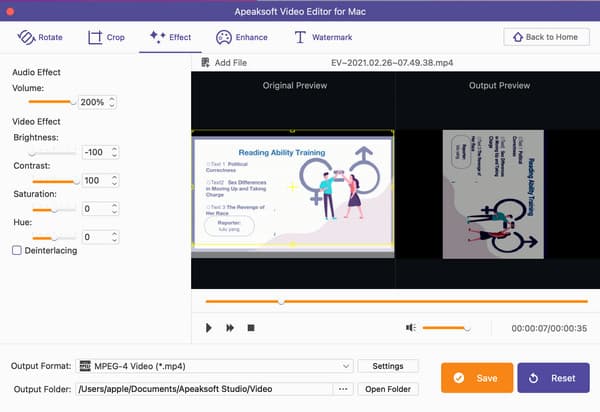
Add Effects
Apeaksoft Video Editor allows you to add video/audio effects as to get a superb video/audio. You can use the Effect feature to achieve your target.
Step 1. Enter the Effect feature
Launch Apeaksoft Video Editor and choose Effect in the main interface.
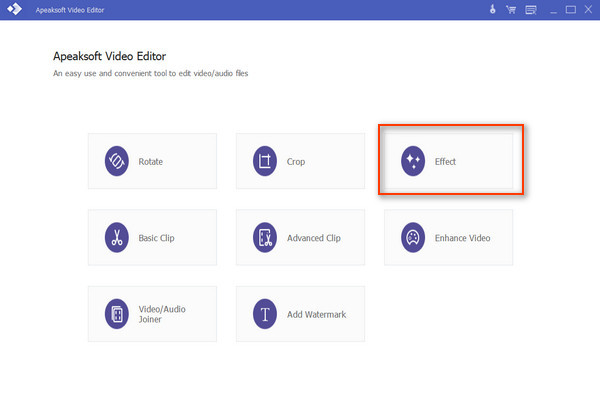
Step 2. Add File
Click Add File to add your video/audio files to this program. Or you can drag and drop the file to the interface directly.
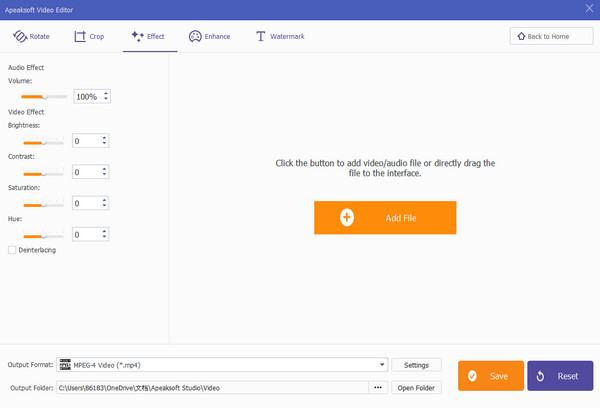
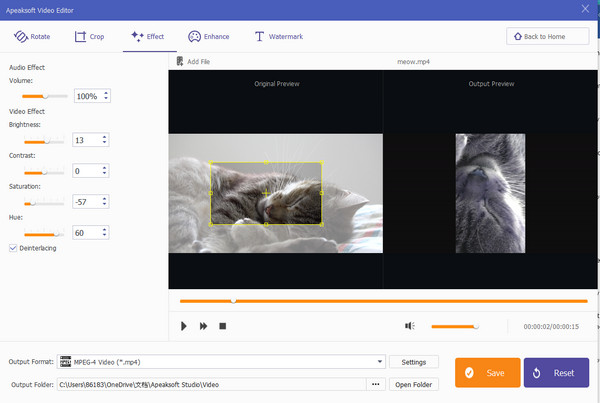
Step 3. Edit Your Video
In the Effect section, you can adjust the audio volume by moving the toggle or clicking the Up or Down button to change the figure from 0% to 200%.
You are also allowed to adjust the video effects on Brightness, Contrast, Saturation and Hue from –100% to 100% using the same way.
If you want to check the effect and adjustments, you can click Play button to preview.
Tick the Deinterlacing box if you want a progressive video.
Step 4. Save Your Video
Select the format, custom settings and the destination for output. Then click the Save button to generate the works.
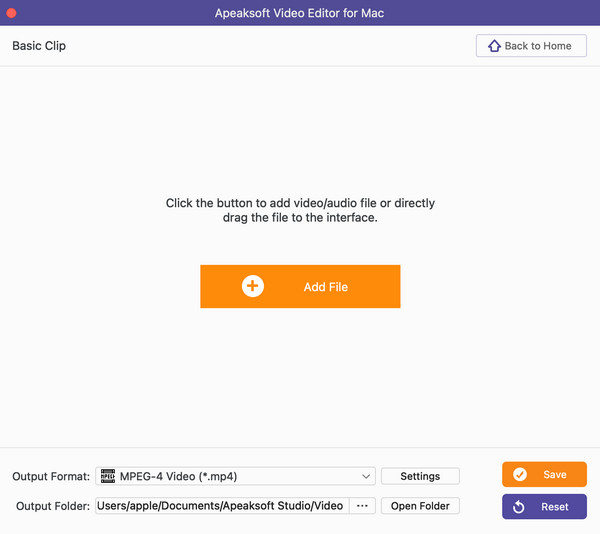
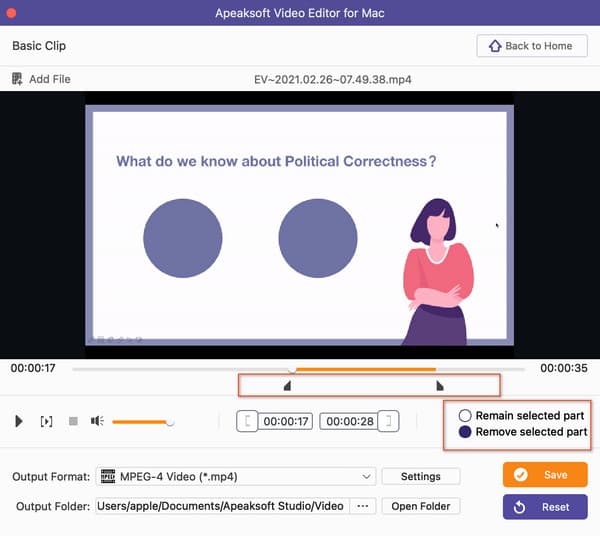
Basic Clip
Basic Clip is the easy feature that lets you trim video. You can choose to remain or remove the part with the editing clips.
Step 1. Enter the Basic Clip feature
Launch Apeaksoft Video Editor and choose Basic Clip in the main interface.
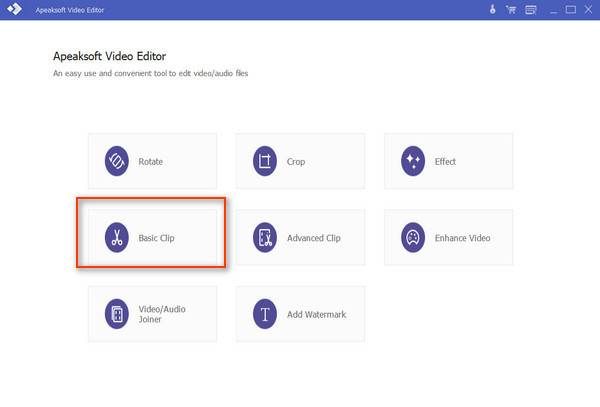
Step 2. Add Files
Click Add File to add your video/audio files. Or you can drag and drop the file to the interface.

Step 3. Clip Your Video
You can move the slide bar right below the video to change the starting point and ending point selectively. After getting the wanted part, you can tick the circle before Remain selected part or Remove selected part to save or leave this clip.
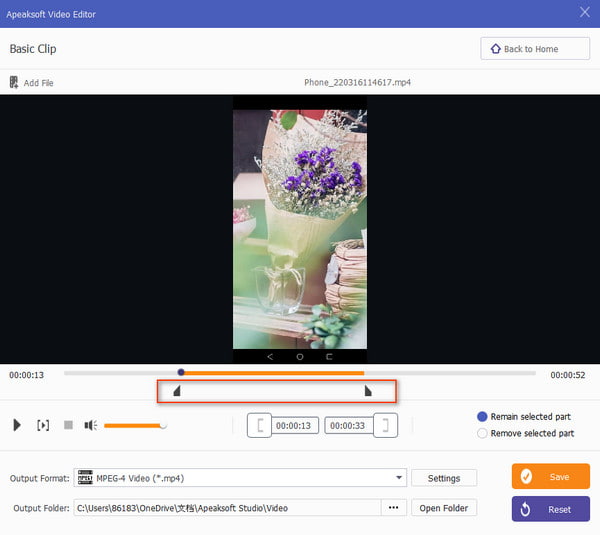
Step 4. Save Your Clip
Select the format, custom settings and the destination for output. Then click the Save button to generate your creation.
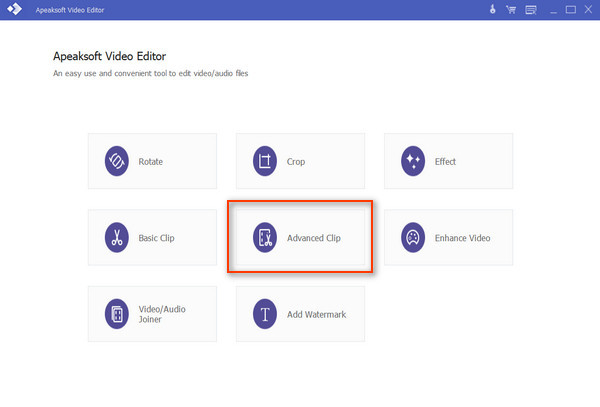
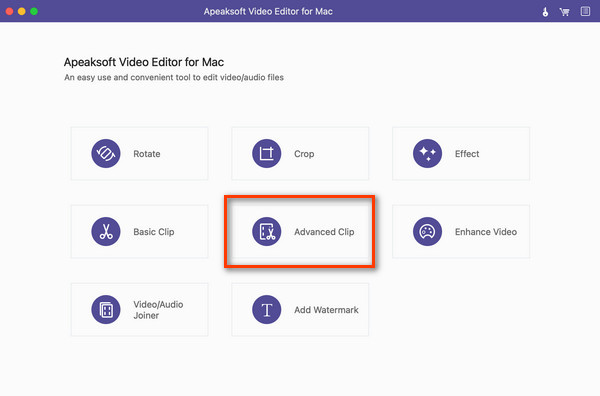
Advanced Clip
Advanced Clip is a more powerful section than Basic Clip. Here you can clip more than one video or audio file, and merge the video or audio files into one in different order.
Step 1. Enter the Advanced Clip feature
Launch Apeaksoft Video Editor and choose Advanced Clip in the main interface.
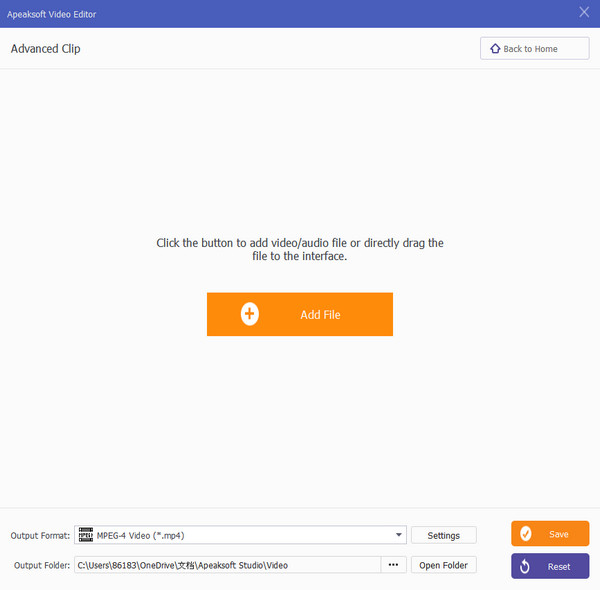
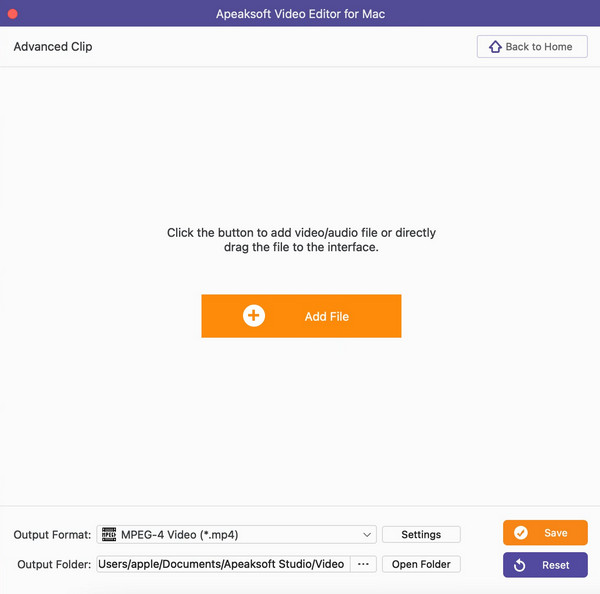
Step 2. Add Files
Click Add File to input your video/audio files. Or you can drag and drop the file to the interface.
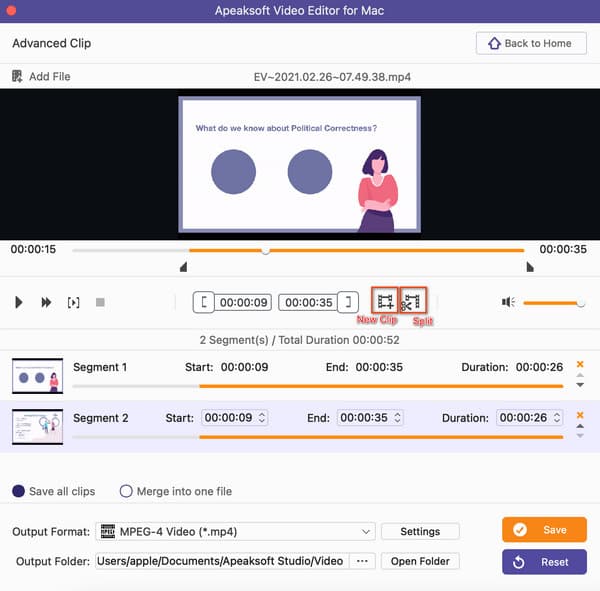
Step 3. Clip Your Video
In the following window, you can move the toggle below the video to change the video duration. Then you can click the Split button to clip this video into different parts.
To create another video clip, you can tap the New Clip button to start another part.
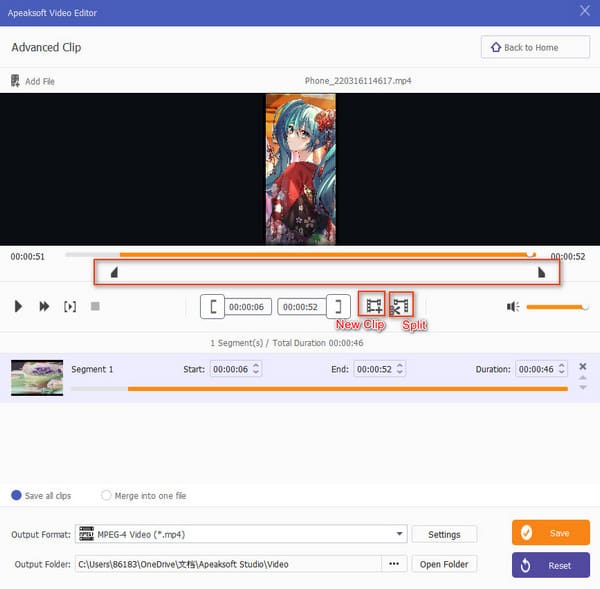
Step 4. Edit Your Video
After that, you can click the Save all clips toggle to save the creation. To combine all clips into one, you can tap the Up or Down arrow following each clip to change the order and tick the Merge into one file before you choose the output format and settings.
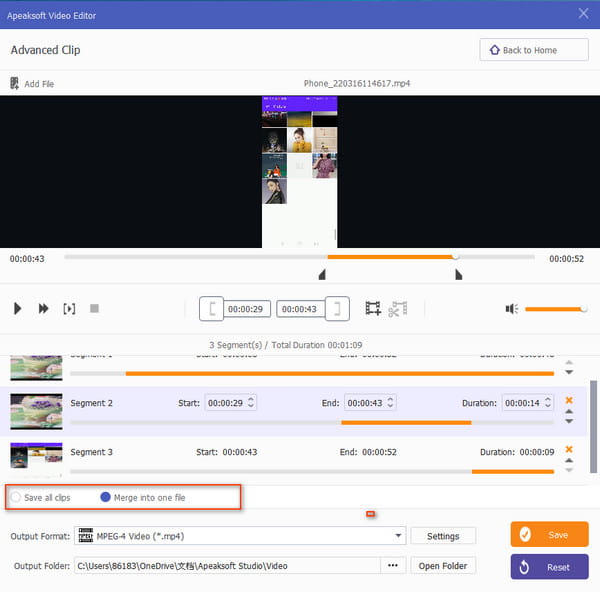
Step 5. Save Your Clip
With all set, click the Save button to generate your creation.
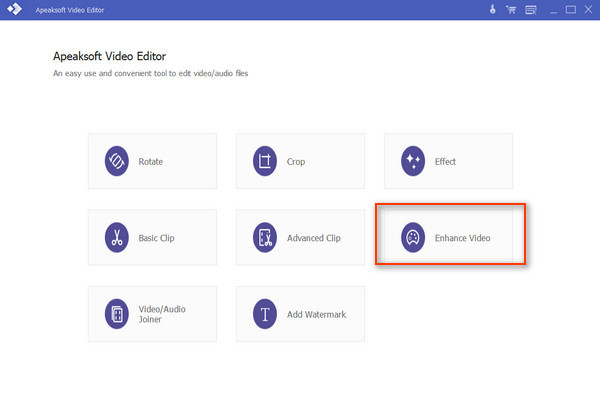
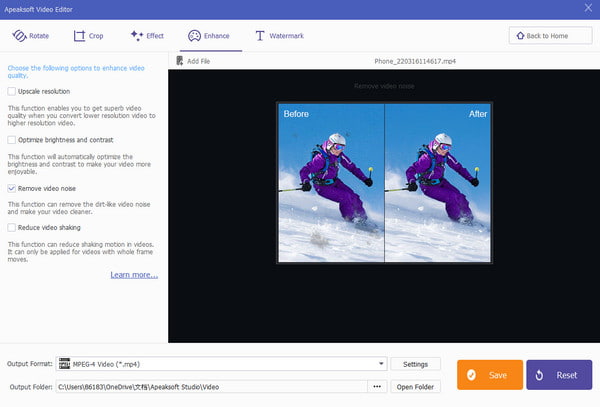
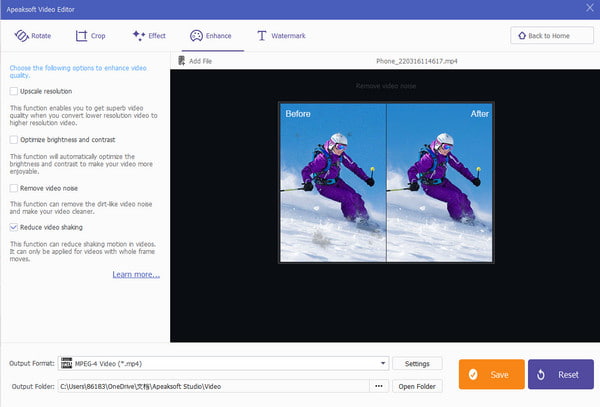
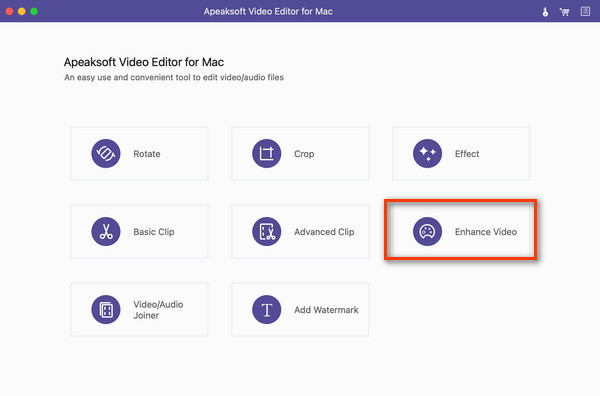
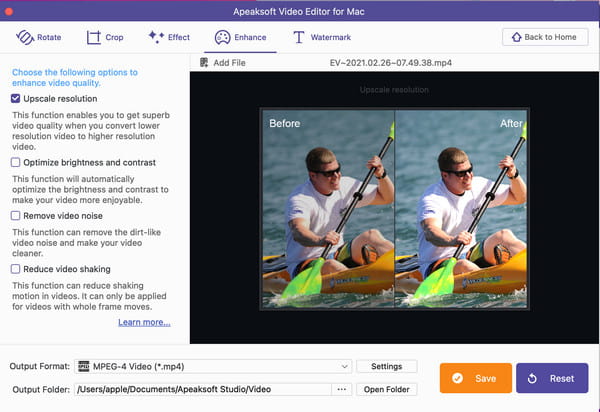
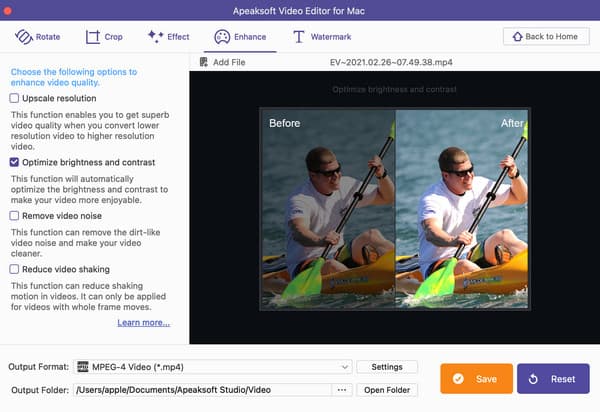
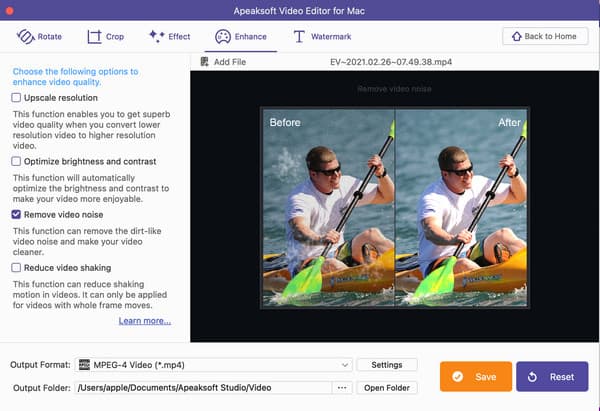
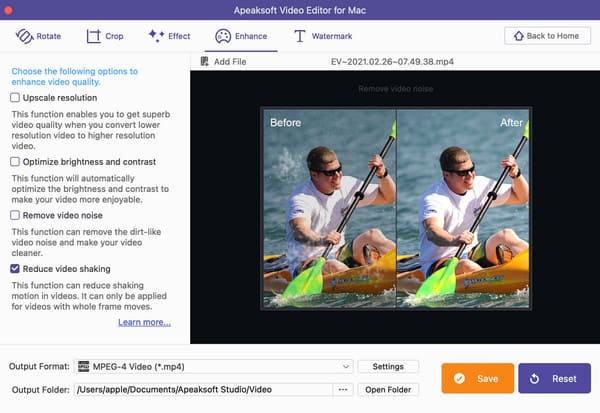
Enhance Video
Enhance Video is introduced in Apeaksoft Video Editor to enable you to get an optimized video with higher quality. You can view the before and after effect in the preview window.
Step 1. Enter the Enhance Video feature
Launch Apeaksoft Video Editor and choose Enhance Video in the main interface.
Step 2. Add File
Click Add File to input your video files. Or you can drag and drop the video to the interface.
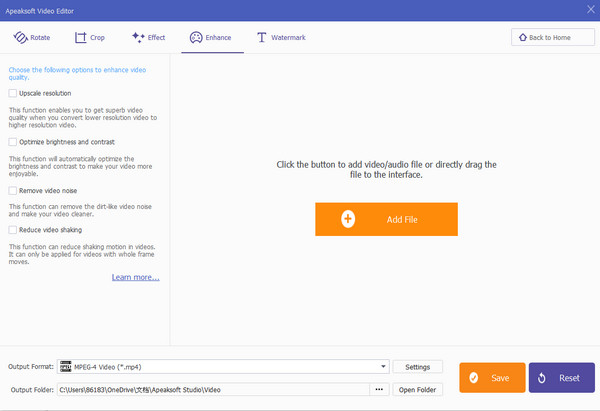
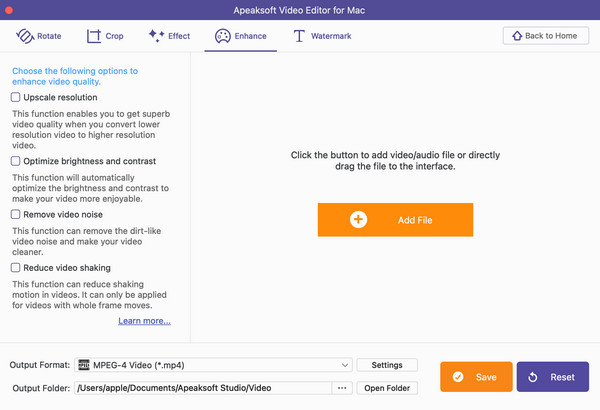
Step 3. Enhance Your Video
In the Enhance section, you can improve your video quality in different aspects. Tick the one in the left list and preview the effect on the right.
Upscale resolution: You can convert a video with low resolution to one with high resolution.
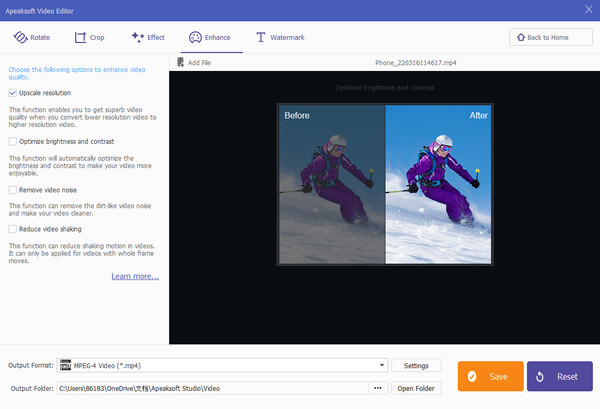
Optimize brightness and contrast: This function enables you to get a more impressive video with automatic effects on video brightness and contrast.

Remove video noise: You can get a clear video without dirt-like noise using this feature.
Reduce video shaking: If you have videos with whole frame moves, you can reduce the shaking motions in your video.
Step 4. Save Your Video
With all set, click the Save button to generate your creation
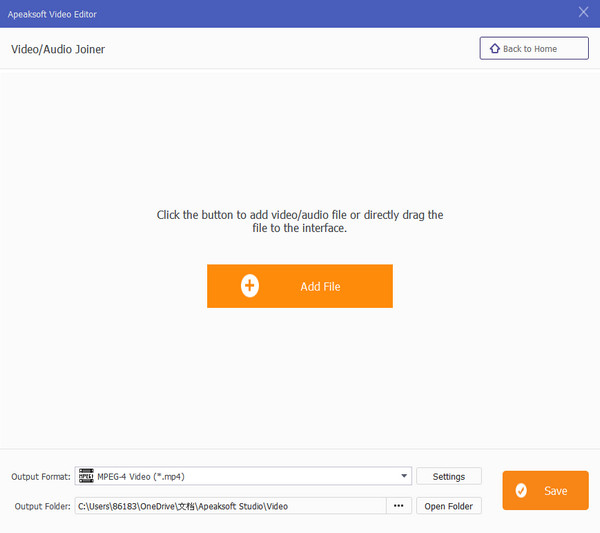
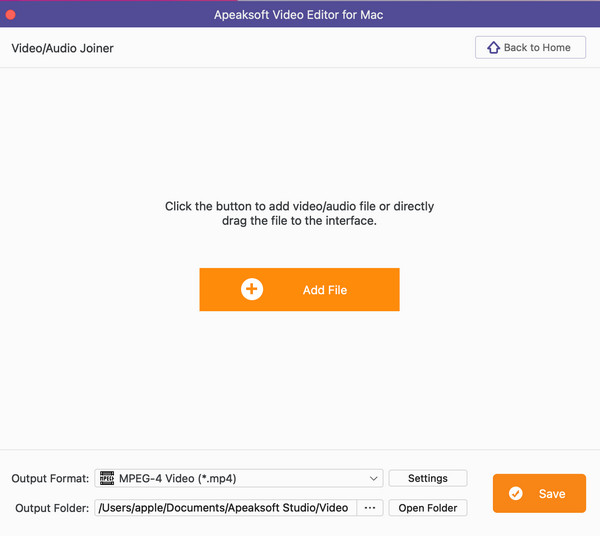
Join Video/Audio
If you want to combine several video parts into one file, you can use the Video/Audio Joiner feature.
Step 1. Enter the Video/Audio Joiner feature
Launch Apeaksoft Video Editor and choose Video/Audio Joiner in the main interface.
Step 2. Add Files
Click Add File to import your video files. Or you can drag and drop the video to the interface.
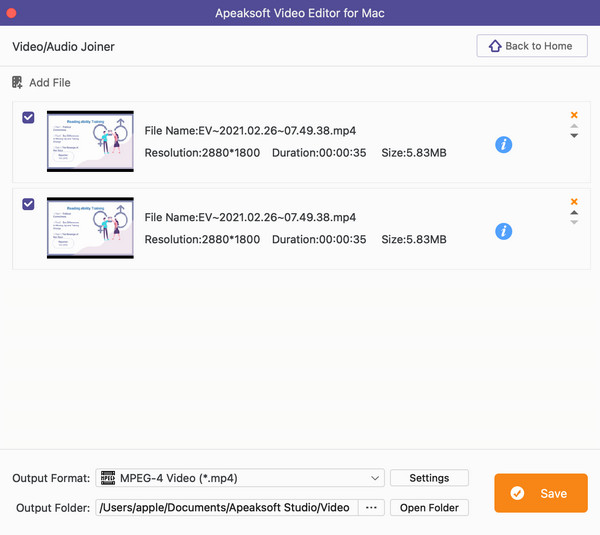
Step 3. Merge Files
In the next window, you can click the Add File button to input more video clips based on your needs. Then you can rearrange them with the following Arrow button.
Tick the wanted clips and then select the output format. Customize the settings and find a folder to save your file.
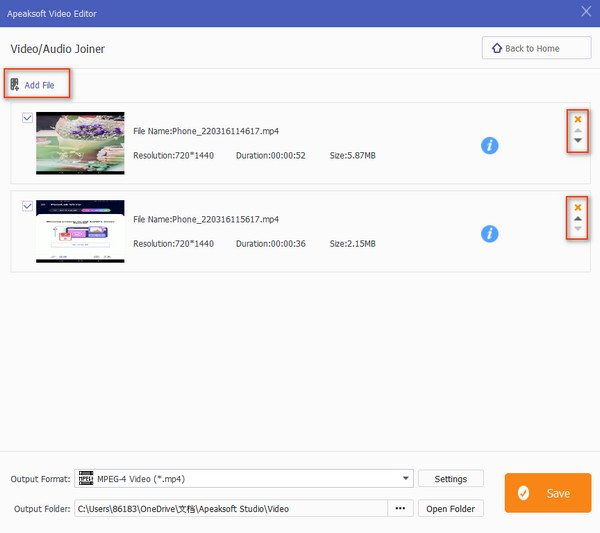
Step 4. Save Your Video
With all set, click the Save button to start the merging and produce the result.
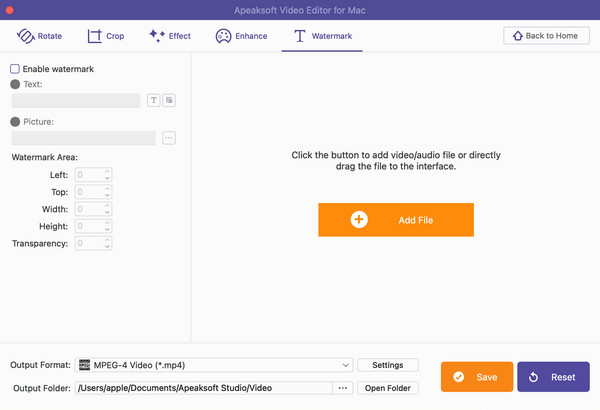
Add Watermark
Want to add a special mark to your video? This video editor lets you watermark your video with the Add Watermark feature.
Step 1. Enter the Add Watermark feature
Launch Apeaksoft Video Editor and choose Add Watermark in the main interface.
Step 2. Input Files
Click Add File to add your video files. Or you can drag and drop the video to the interface. Then you can choose to add text or picture watermark with the following instructions.
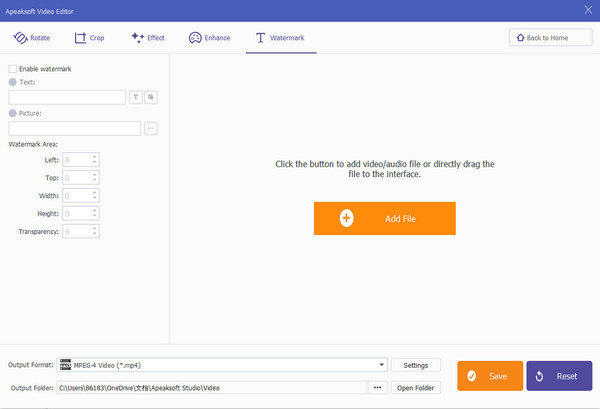
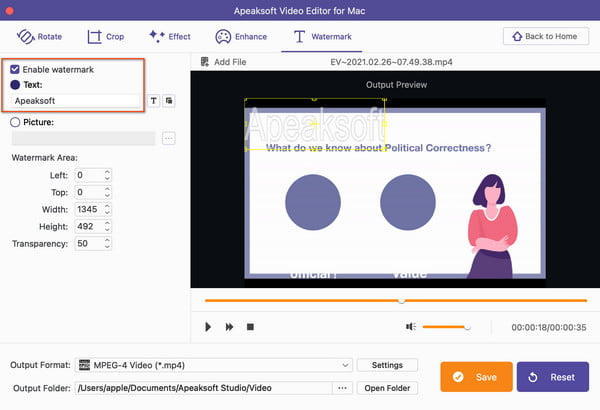
Add Text Watermark
Step 1. Tick the Enable watermark box. Then you can select the Text toggle and input the content in the box below.
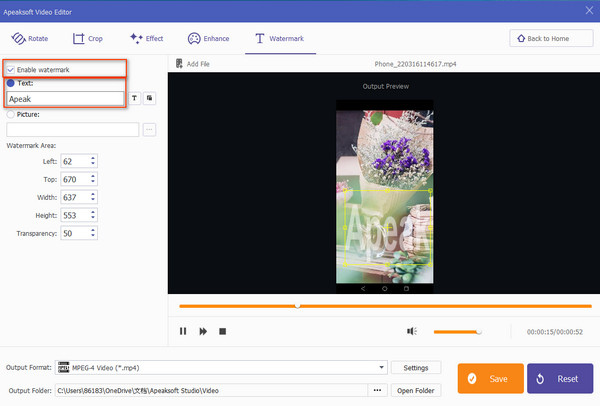
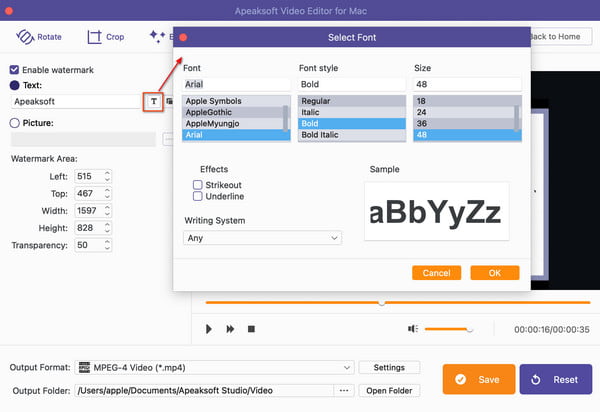
Step 2. Click the Select Font button and you and view and change the text font, style, size, effect and writing system while previewing the sample. Then choose the OK button to save the changes.
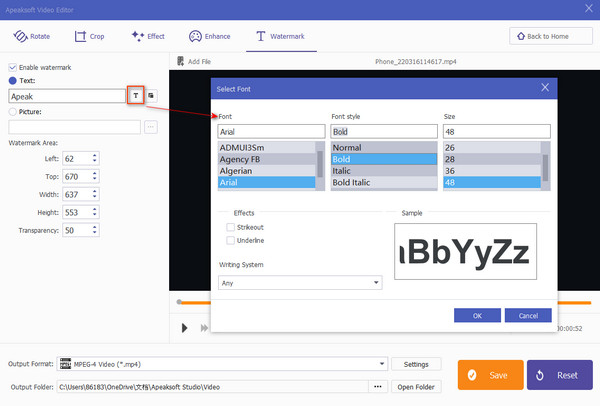
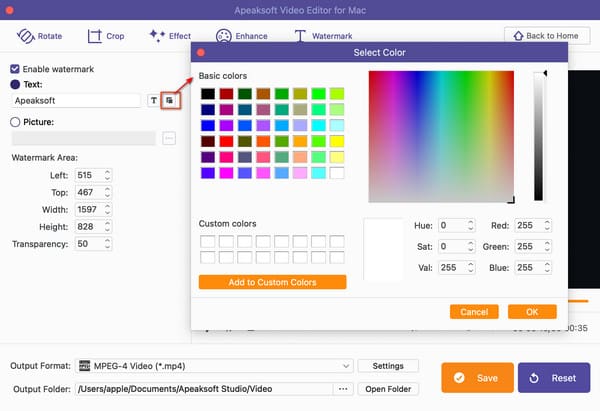
If you want to change the text color, click the Select Color button and decide on the wanted color. Click the OK button to continue.
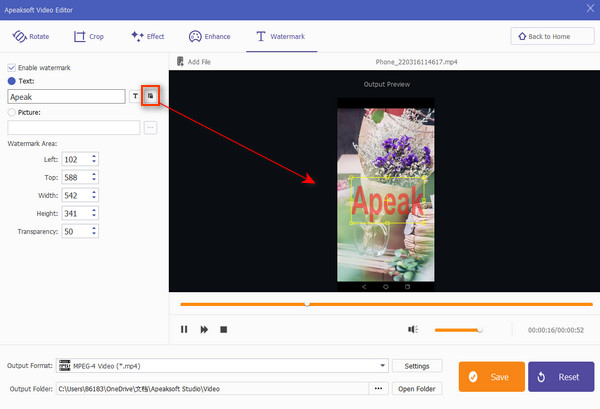
Step 3. Move the text watermark to your ideal place on the video directly. Then finish the settings at the bottom and click the Save button to complete the process.
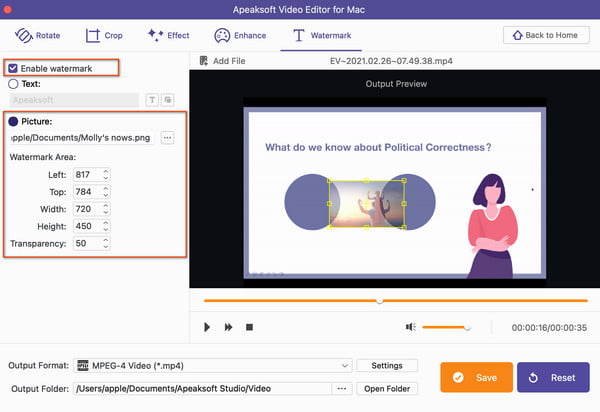
Add Picture Watermark
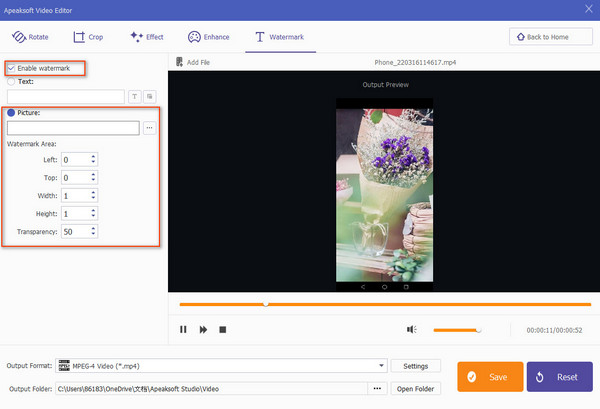
Step 1. Tick the Enable watermark box. Then you can select the Picture toggle and open the Select button to input the wanted picture.
Step 2. Then you can adjust the watermark area on its location, width, height and transparency by changing the figure or clicking the Arrow button. You can also drag the picture watermark on the video directly to change its place.
Step 3. Select the output format and finish the settings for your video. Find a path to save it and click the Save button to generate the creation.
User Guide
- Getting Started
- Quick Start
- Rotate Video
- Crop Video
- Add Effect
- Basic Clip
- Advanced Clip
- Enhance Video
- Join Video/Audio
- Add Watermark
Try It Now!
Getting Started
Install software
Before installing this software, you should make sure that your computer meets the following requirements:
For Windows users:
Windows OS: Windows 11, Windows 10, Windows 8.1, Windows 8, Windows 7, Windows Vista, Windows XP (SP2 or later)
CPU: 1GHz Intel/AMD CPU or above
RAM: 1G RAM or more
For Mac users:
Mac OS: macOS 14, 13, 12, 11, 10.15, 10.14, 10.13, 10.12, etc.
CPU: 1.4GHz dual-core Intel Core i5 or above and Apple M1/M2/M3 chip
RAM: 1GB system memory
Hard Disk Space: 2GB hard drive space
How to Install Video Editor on Your Mac:
Step 1. Click the Free Download button on the top banner of this interface to access Apeaksoft Video Editor, according to your computer model. Then double-click the downloaded .dmg file.
Step 2. Drag the button to the application folder. Follow the on-screen instructions and click the Open button. Then you can launch this program.
Launch software
Reach Apeaksoft Video Editor on your desktop by double-clicking the button on the launchpad or dock.
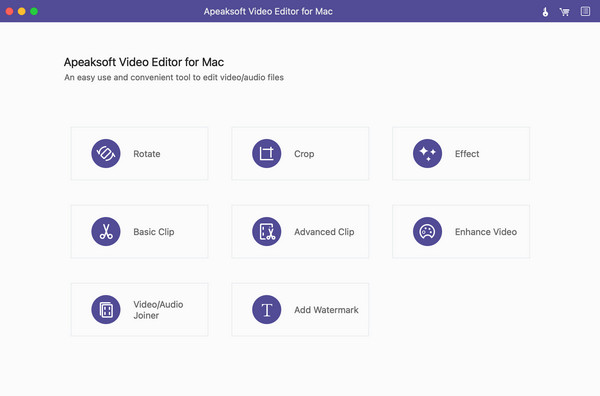
User interface
After launching Apeaksoft Video Editor, you can enjoy the intuitive and simple user interface. All the tools for video editing and enhancing are available for use, including Rotate, Crop, Effect, Basic Clip, Advanced Clip, Enhance Video, Video/Audio Joiner, and Add Watermark.
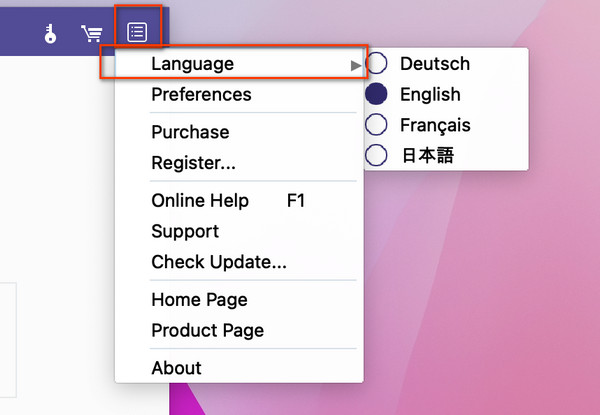
Language
You can change the default language on the Menu button and select among the 4 options: Dutch, English, French and Japanese.
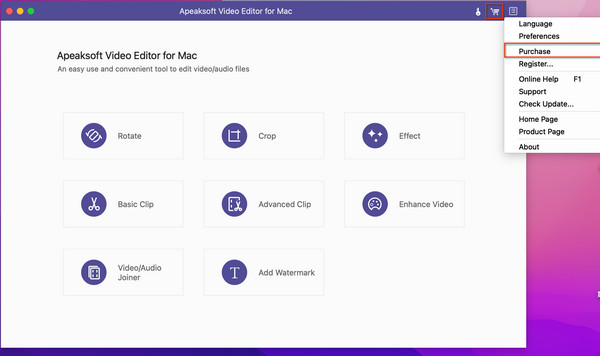
Order software
You can purchase the full version of Apeaksoft Video Editor to get free update and technical support. You can open the Purchase button to view the subscription plan for your Windows or open the Menu button and enter the Purchase section.
After you purchase the product successfully, you can receive the registration code within the email.
Register software
You can enjoy the free trial version of Apeaksoft Video Editor up to 30 days. But to use the full functions and high quality, you are suggested to purchase this software and register.
Step 1. Click the Register button on the top menu in the main interface.
Step 2. Input your email address and the registration code you receive when purchasing this software (Click the Purchase button at the bottom if you don’t have one). Then click the Register button to complete the registration.
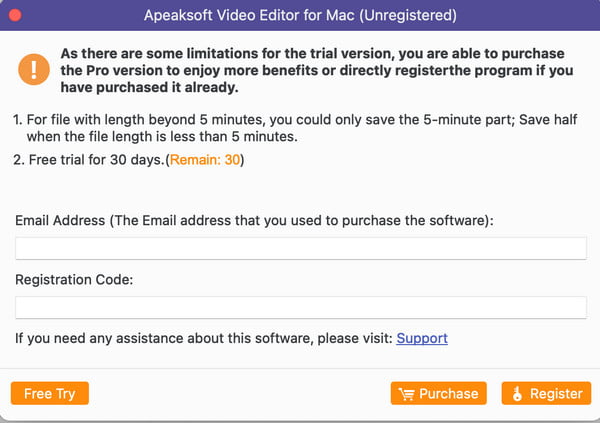
Now you are guaranteed full access to all functions to this video editor.
Update software
You can get the latest update from the Menu button to land on the Check Update section. Please ensure your Windows PC is connected to the network.
Apeaksoft support
Apeaksoft provides you professional solutions in case you encounter any problems when using our product.
Channel 1. Visit our Support Center and ask any questions.
Channel 2. Click the Menu button on the top right corner and reach the Support section.
Channel 3. Email us at support@apeaksoft.com.
Quick Start
Apeaksoft Video Editor is a comprehensive and powerful video editing tool on your Mac to rotate, crop, clip, add watermarks and effects as well as convert video/audio files.
Step 1. Choose an Ideal Editing Feature
Select the ideal feature to edit or enhance your video in the main interface. You can choose among: Rotate, Crop, Effect, Basic Clip, Advanced Clip, Enhance Video, Video/Audio Joiner and Add Watermark.
Step 2. Add File
Click the Add File button to input your program. Or you can drag and drop the target video or audio to the main interface.
Step 3. Edit the Video
Edit and enhance your video file based on your needs. Then you can change the output format and customize the settings on the video and audio. Select the destination and click the Save button to start the conversion.
Rotate Video
The Rotate function enables you to change the video direction 90 clockwise or 90 counterclockwise. Besides, you can flip the video horizontally or vertically.
Step 1. Enter the Rotate feature
Launch Apeaksoft Video Editor and choose Rotate in the main interface.
Step 2. Add File
Click Add File to add your video/audio files to this program. Or you can drag the file to the interface directly.
Step 3. Rotate Your Video
In the Rotate section, you can choose to rotate your video 90 clockwise, 90 counter clockwise, horizontally or vertically with the options in the left list. Preview the effect on the right whenever you want.
Step 4. Save Your Video
Change the format, custom settings and the destination for output. Then click the Save button to generate the works.
Crop Video
This video editor allows you to crop and resize your video. When you want to remove the letterbox for your favorite video, you can choose this Crop feature.
Step 1. Enter the Crop feature
Launch Apeaksoft Video Editor and choose Crop in the main interface.
Step 2. Add File
Click Add File to add your video/audio files to this program. Or you can drag the file to the interface directly.

Step 3. Crop Your Video
In the Crop section, you can change the crop area size and customize the aspect ratio with your needs or classic match like 16:9 and 4:3. You are free to adjust the position of the crop area accurately and select the zoom mode among Letterbox, Medium, Pan& Scan and Full.
Step 4. Save Your Video
Change the format, custom settings and the destination for output. Then click the Save button to generate the works.
Add Effects
Apeaksoft Video Editor allows you to add video/audio effects as to get a superb video/audio. You can use the Effect feature to achieve your target.
Step 1. Enter the Effect feature
Launch Apeaksoft Video Editor and choose Effect in the main interface.
Step 2. Add File
Click Add File to add your video/audio files to this program. Or you can drag and drop the file to the interface directly.
Step 3. Edit Your Video
In the Effect section, you can adjust the audio volume by moving the toggle or clicking the Up or Down button to change the figure, from 0% to 200%.
You are also allowed to adjust the video effects on Brightness, Contrast, Saturation and Hue from -100% to 100% using the same way.
Tick the Deinterlacing box if you want a progressive video.
Step 4. Save Your Video
Select the format, custom settings and the destination for output. Then click the Save button to generate the works.
Basic Clip
Basic Clip is the easy feature that lets you trim video. You can choose to remain or remove the part with the editing clips.
Step 1. Enter the Basic Clip feature
Launch Apeaksoft Video Editor and choose Basic Clip in the main interface.
Step 2. Add File
Click Add File to add your video/audio files. Or you can drag and drop the file to the interface.
Step 3. Clip Your Video
You can move the slide bar right below the video to change the starting point and ending point selectively. After getting the wanted part, you can tick the circle before Remain selected part or Remove selected part to save or leave this clip.
Step 4. Save Your Clip
Select the format, custom settings and the destination for output. Then click the Save button to generate your creation.
Advanced Clip
Advanced Clip is a more powerful section than Basic Clip. Here you can clip more than one video or audio file, and merge the video or audio files into one in different order.
Step 1. Enter the Advanced Clip feature
Launch Apeaksoft Video Editor and choose Advanced Clip in the main interface.
Step 2. Add Files
Click Add File to input your video/audio files. Or you can drag and drop the file to the interface.
Step 3. Clip Your Video
In the following window, you can move the toggle below the video to change the video duration. Then you can click the Split button to clip this video into different parts.
To create another video clip, you can tap the New Clip button to start another part.
Step 4. Edit Your Video
After that, you can click the Save all clips toggle to save the creation. To combine all clips into one, you can tap the Up or Down arrow following each clip to change the order and tick the Merge into one file before you choose the output format and settings.
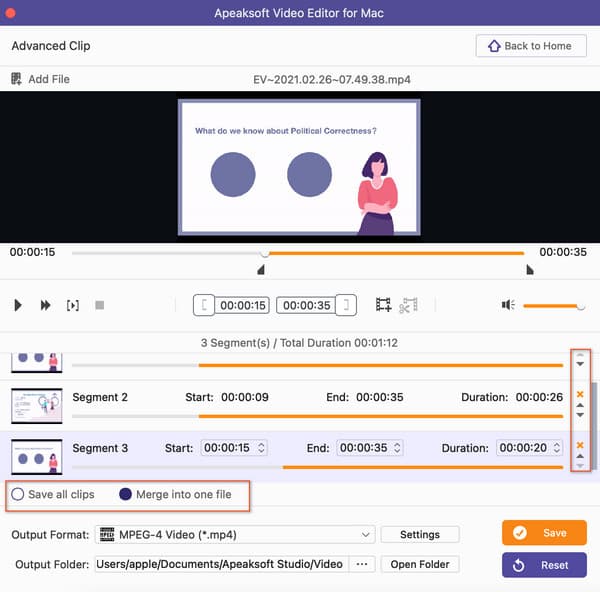
Step 5. Save Your Clip
With all set, click the Save button to generate your creation.
Enhance Video
Enhance Video is introduced in Apeaksoft Video Editor to enable you to get an optimized video with higher quality. You can view the before and after effect in the preview window.
Step 1. Enter the Enhance Video feature
Launch Apeaksoft Video Editor and choose Enhance Video in the main interface.
Step 2. Add File
Click Add File to input your video files. Or you can drag and drop the video to the interface.
Step 3. Enhance Your Video
In the Enhance section, you can improve your video quality in different aspects. Tick the one in the left list and preview the effect on the right.
Upscale resolution: You can convert a video with low resolution to one with high resolution.
Optimize brightness and contrast: This function enables you to get a more impressive video with automatic effects on video brightness and contrast.
Remove video noise: You can get a clear video without dirt-like noise using this feature.
Reduce video shaking: If you have videos with whole frame moves, you can reduce the shaking motions in your video.
Step 4. Save Your Video
With all set, click the Save button to generate your creation.
Join Video/Audio
If you want to combine several video parts into one file, you can use the Video/Audio Joiner feature.
Step 1. Enter the Video/Audio Joiner feature
Launch Apeaksoft Video Editor and choose Video/Audio Joiner in the main interface.
Step 2. Add File
Click Add File to import your video files. Or you can drag and drop the video to the interface.
Step 3. Merge Files
In the next window, you can click the Add File button to input more video clips based on your needs. Then you can rearrange them with the following Arrow button.
Tick the wanted clips and then select the output format. Customize the settings and find a folder to save your file.
Step 4. Save Your Video
With all set, click the Save button to start the merging and produce the result.
Add Watermark
Want to add a special mark on your video? This video editor enables you to watermark your video with the Add Watermark feature.
Step 1. Enter the Add Watermark feature
Launch Apeaksoft Video Editor and choose Add Watermark in the main interface.
Step 2. Input Files
Click Add File to add your video files. Or you can drag and drop the video to the interface. Then you can choose to add text or picture watermark with the following instructions.
Add Text Watermark
Step 3. Tick the Enable watermark box. Then you can select the Text toggle and input the content in the box below.
Step 4. Click the Select Font button and you and view and change the text font, style, size, effect and writing system while previewing the sample. Then choose the OK button to save the changes.
If you want to change the text color, click the Select Color button and decide on the wanted color. Click the OK button to continue.
Step 5. Move the text watermark to your ideal place on the video directly. Then finish the settings at the bottom and click the Save button to complete the process.
Add Picture
Step 3. Tick the Enable watermark box. Then you can select the Picture toggle and open the Select button to input the wanted picture.
Step 4. Then you can adjust the watermark area on its location, width, height and transparency by changing the figure or clicking the Arrow button. You can also drag the picture watermark on the video directly to change its place.
Step 5. Select the output format and finish the settings for your video. Find a path to save it and click the Save button to generate the creation.
