User Guide
- Download & Install
- Register
- Erase All Data
- Free up Space
- Eraser Tips
Try It Now!
Download & Install
Part 1. How to download iPhone Eraser
You can download iPhone Eraser to your computer from its official website, https://www.apeaksoft.com/iphone-eraser/, click the Download button to download the .exe file to your computer.
Or you are able to download this software by clicking its download link here.
Part 2. How to install iPhone Eraser
After downloading this software to your computer, you can follow the guide below to install this program.
Double-click the .exe file on your computer, and follow the on-screen instructions to install the software on your computer.
If there is a pop-up window reminds this software may contain virus, please try to turn off your anti-virus software and install this software successfully.
Apeaksoft iPhone Eraser has proved to be ads-free without virus. You can use it safely.
Register
When you install this software, it will launch with the free trial version. You can benefit from the free version of iPhone Eraser as below:
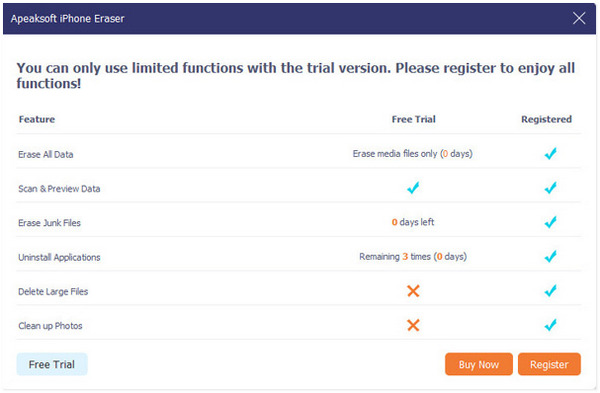
To use this software in full features, you should register it.
Click the register button (A lock image) from the menu, input the email address and registration code into the bar, and click Register to complete the registration process.
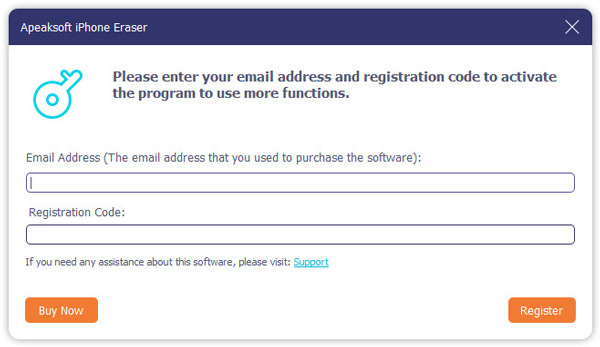
Email Address: The email address that you fill in the order form.
Registration Code: A string of characters marked as Activation key, license code, or KEYCODE(S) in the order confirmation letter you received after the successful purchase.
Erase All Data
iPhone Eraser can wipe all content and settings on your iPhone before you sell or give it away.
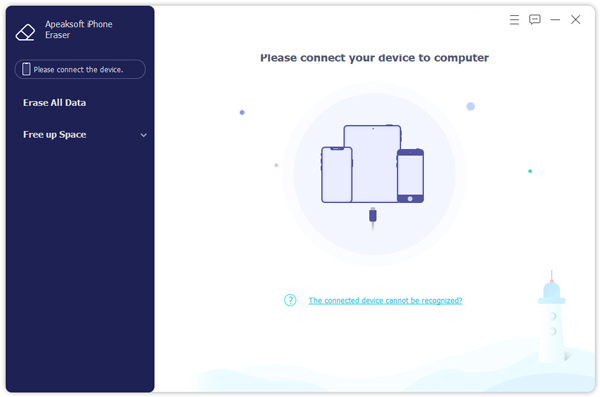
Step 1: Connect iPhone to computer
Plug your iPhone into a computer with a USB cable. Unlock your iPhone and tap Trust when a message pops up on your iPhone.
If your iPhone is connected but not detected by this software, you can
1. Install the latest iTunes on your computer.
2. Re-connect iOS device.
3. Change a USB cable or USB port on your computer.
4. Make sure your iOS device is not in Recovery or DFU mode.
5. Contact our support team: support@apeaksoft.com, if the above solutions do not work.
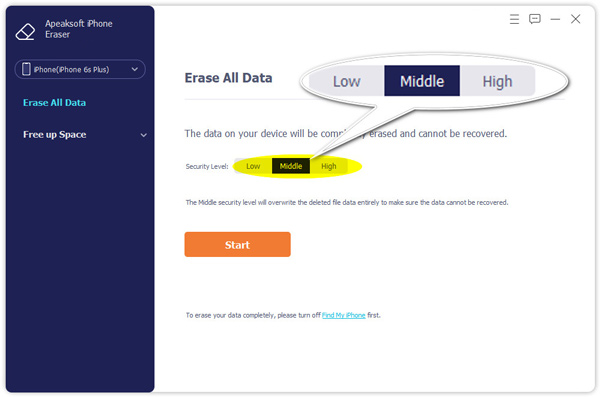
Step 2: Select security level
This software provides you with three levels of erasing: Low, Middle, and High.
Here you need to select the security level from one of them.
Low: The Low security level enables you to quickly erase all the data on your device, which is twice as fast as other security levels.
Middle: The Middle security level will overwrite the deleted data entirely to make sure the data cannot be recovered.
High: The High security level adopts DoD 5220.22-M wiping standard that can help you erase private data like password files and bank records.
After confirming the security level, click the Start button.
Note: To erase your data completely and successfully, you should turn off Find My iPhone/iPad first.
Step 3: Start erasing iPhone
In the pop-up window, please enter 0000 to confirm the erasing.
Then click Erase to erase all data on your iOS device.
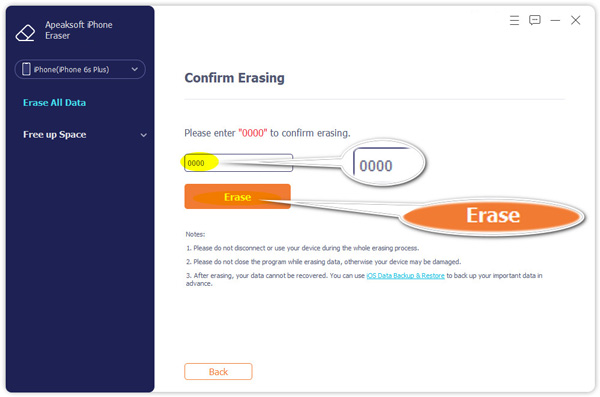
Note: The Erase All Data function will not erase data in the Files app, all passwords in Settings, Wi-Fi password, device passcode, Voice Mail, etc.
Do not miss the hot articles to erase iPhone data:
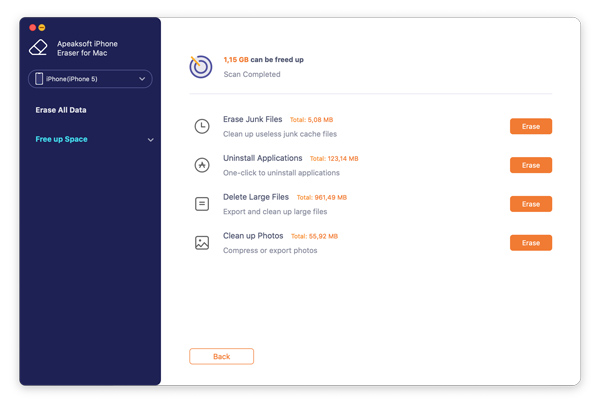
Free up Space
Apart from erasing all data and settings on iOS devices, this software can also help you to free up space by erasing junk files, uninstalling applications, deleting large files, and cleaning up photos.
Just click Free Up Space from the left sidebar, and click Quick Scan to start scanning your iPhone data quickly.
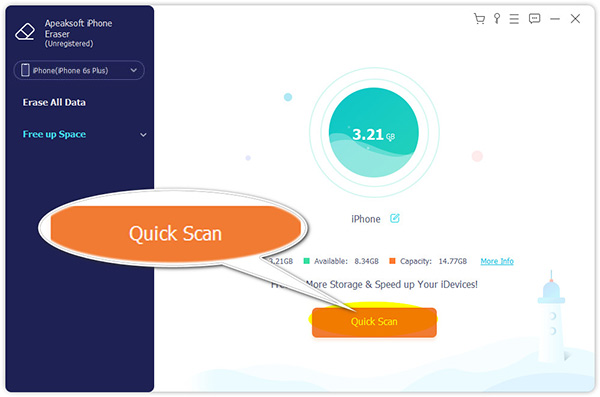
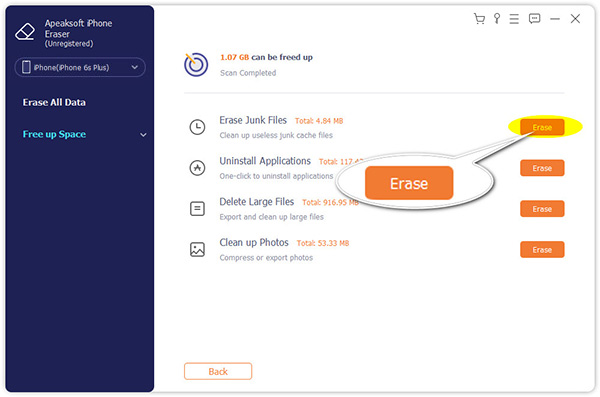
Then this software will scan all the junk files, applications, large files and photos quickly. You can select one data type and click Erase to start freeing up space quickly on iPhone.
To free up space on iPhone for every separate data type, you just move to the next part.
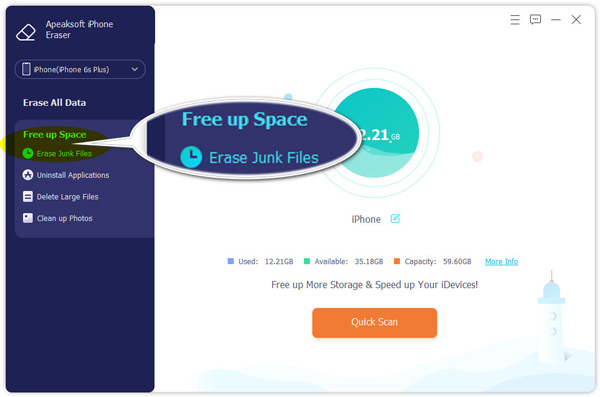
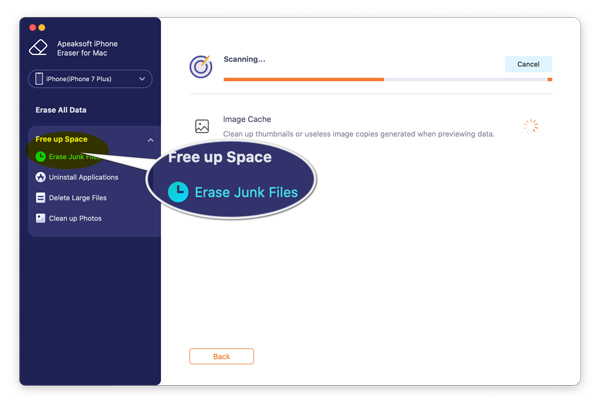
Erase Junk Files
Step 1: Scan Erase Junk Files
After connecting your iPhone to this computer, expand the tray of Free up Space from the left pane and select Erase Junk Files.
Then this software will start scanning your iPhone automatically.
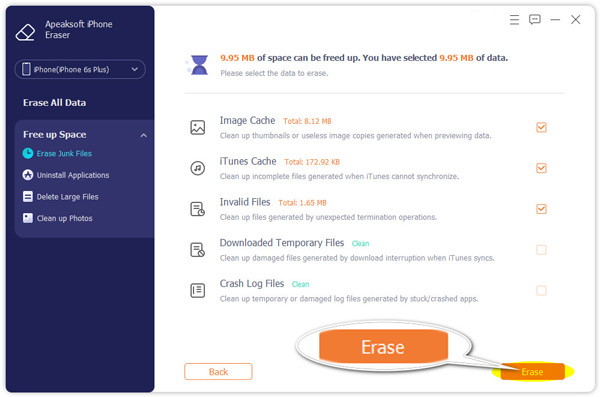
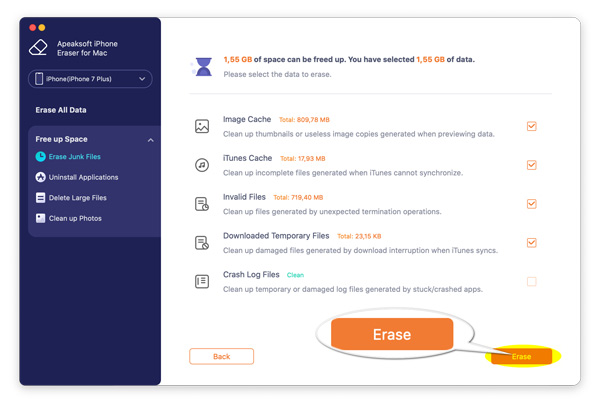
Step 2: Erase junk files
When the scanning process is done, you can see all the junk files like image cache, iTunes cache, invalid files, crash log files, and so on.
Checkmark the box next to the types of junk files and click Erase to start erasing the junk files.
Explore more topics about erasing iPhone junk files:
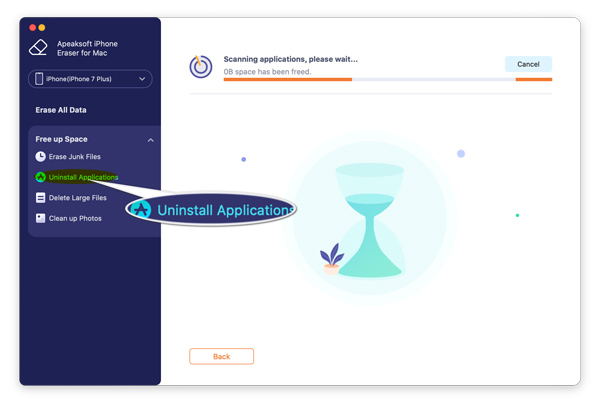
Uninstall Applications
Step 1: Scan applications on iPhone
Expand the tray of Free up Space from the left pane and select Uninstall Applications after connecting iPhone to this computer.
Then this program will begin scanning all the applications installed on your device.

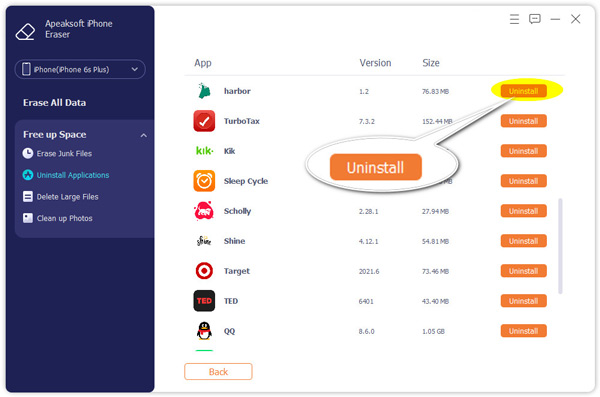
Step 2: Uninstall apps
Once the scan is complete, you can see all the apps, not including the pre-installed apps, display on the right pane.
Click the Uninstall button next to the app to remove it from your device.
Delete Large Files
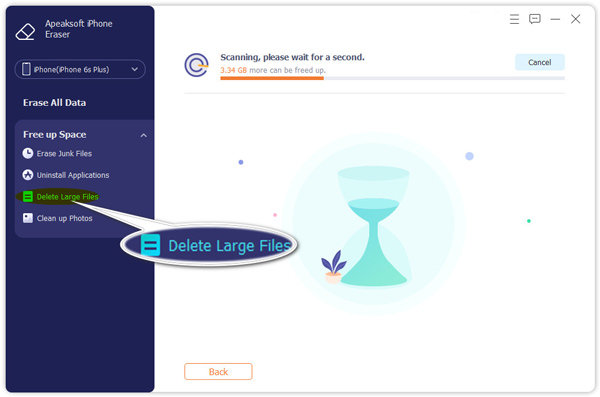
Step 1: Scan large files on iPhone
Expand the tray of Free up Space from the left pane and select Delete Large Files after connecting iPhone to this computer.
Then this tool will begin scanning all the large files on your iOS device.
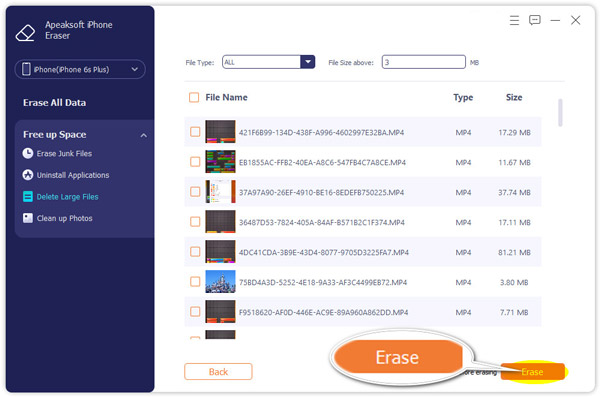
Step 2: Delete large files
When the scan is finished, the filter feature at the top lets you filter the data type and file size to display on the right side.
Tick the boxes before the large files, and click the Erase button to delete the large files immediately.
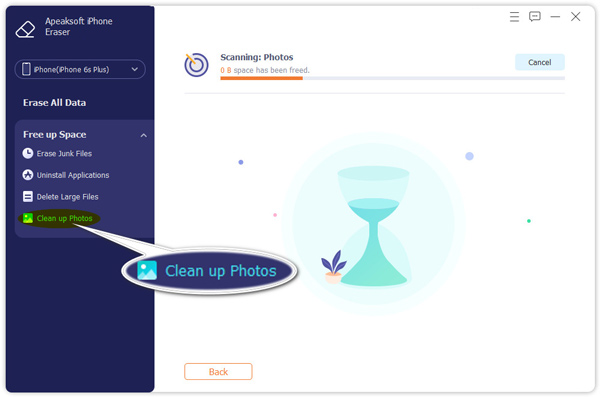
Clean up Photos
Step 1: Scan iPhone photos
Expand the tray of Free up Space from the left pane and select Clean up Photos after connecting your iOS device to this computer.
Then this tool will begin scanning all the photos on your iOS device.
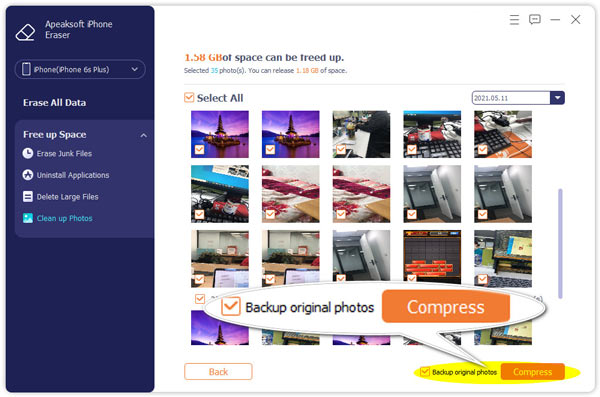
Step 2: Backup & compress optionally
When the scanning process ends, you are given the options to Backup & Compress or Export & Delete the photos.
If you want to save the iPhone photos to computer before deleting them, just click Backup & Compress.

Then it will show all the photos and just select the ones that you want to backup, and click Compress.

If you have enough space on PC, and want to keep the original quality of the images, just tick the box next to Compress.
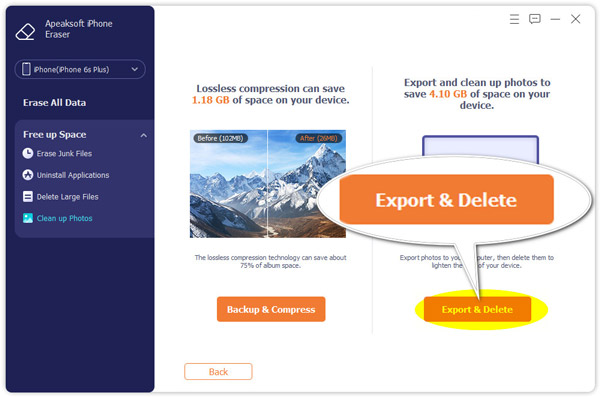
Step 3: Export & delete photos
For saving iPhone photos to computer and then deleting them from an iOS device, you should click Export & Delete.
Then all the images will display in this software.
Select the items that you want to export, click the Export button at the bottom and select the location to store those photos on your computer.

After that, you can checkmark the photos that you want to delete, and click the Delete button to remove them from your iOS device to free up more space.

User Guide
- Download & Install
- Install and Register
- Register
- Erase All Data
- Free up Space
- Eraser Tips
Try It Now!
Download & Install
Part 1. How to download iPhone Eraser
You can download iPhone Eraser from the official website of it, https://www.apeaksoft.com/iphone-eraser/, and press the Download button to get the .dmg file on your Mac.
Or you are able to download this software by clicking its download link here.
Part 2. How to install iPhone Eraser
After downloading this software to your computer, you can follow the guide below to install this program.
Double-click the .dmg file on your Mac, and follow the on-screen instructions to install the software on your Mac computer.
Apeaksoft iPhone Eraser for Mac is proved to be ads-free without virus. You can use it safely.
Register
When you install this software, it will launch with the free trial version. You can benefit from the free version of iPhone Eraser for Mac as below:
To use this software in full features, you should register it.
Click the register button (A lock image) from the drop-down list of Help in the upper-left corner of the menu, input the email address and registration code into the bar, and click Register to complete the registration process.
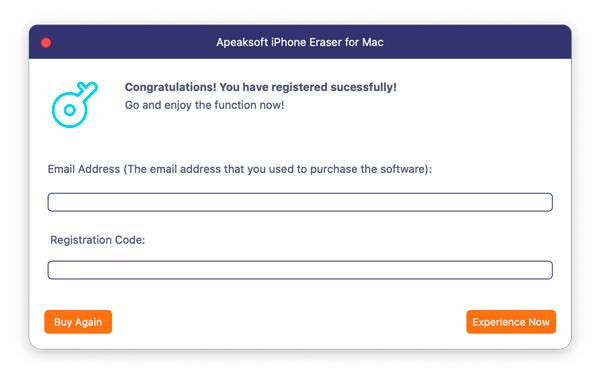
Email Address: The email address that you fill in the order form.
Registration Code: A string of characters marked as Activation key, license code, or KEYCODE(S) in the order confirmation letter you received after the successful purchase.
Erase All Data
iPhone Eraser can wipe all content and settings on your iPhone before you sell or give it away.
Step 1: Connect iPhone to computer
Plug your iPhone into a computer with a USB cable. Unlock your iPhone and tap Trust when a message pops up on your iPhone.
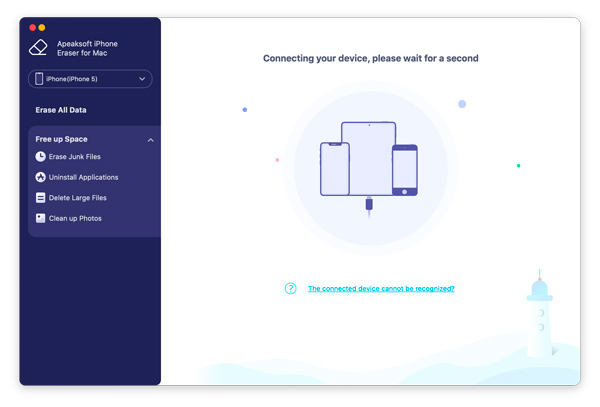
If your iPhone is connected but not detected by this software, you can
1. Install the latest iTunes on your computer.
2. Re-connect iOS device.
3. Change a USB cable or USB port on your computer.
4. Make sure your iOS device is not in Recovery or DFU mode.
5. Contact our support team: support@apeaksoft.com, if the above solutions do not work.
Step 2: Select security level
This software provides you with three levels of erasing: Low, Middle, and High.
Here you need to select the security level from one of them.
Low: The Low security level enables you to quickly erase all the data on your device, which is twice as fast as other security levels.
Middle: The Middle security level will overwrite the deleted data entirely to make sure the data cannot be recovered.
High: The High security level adopts DoD 5220.22-M wiping standard that can help you erase private data like password files and bank records.
After confirming the security level, click the Start button.
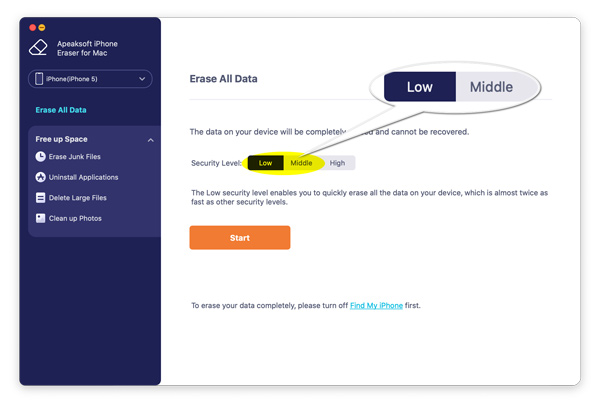
Note: To erase your data completely and successfully, you should turn off Find My iPhone/iPad first.
Step 3: Start erasing iPhone
In the pop-up window, please enter 0000 to confirm the erasing.
Then click Erase to erase all data on your iOS device.
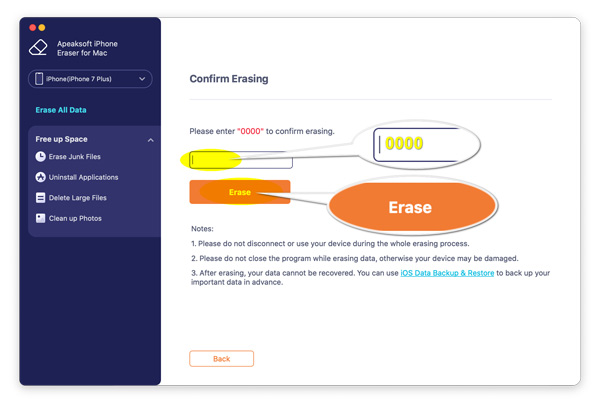
Note: The Erase All Data function will not erase data in the Files app, all passwords in Settings, Wi-Fi password, device passcode, Voice Mail, etc.
Do not miss the hot articles to erase iPhone data:
Free up Space
Apart from erasing all data and settings on iOS devices, this software can also help you to free up space by erasing junk files, uninstalling applications, deleting large files, and cleaning up photos.
Just click Free Up Space from the left sidebar, and click Quick Scan to start scanning your iPhone data quickly.
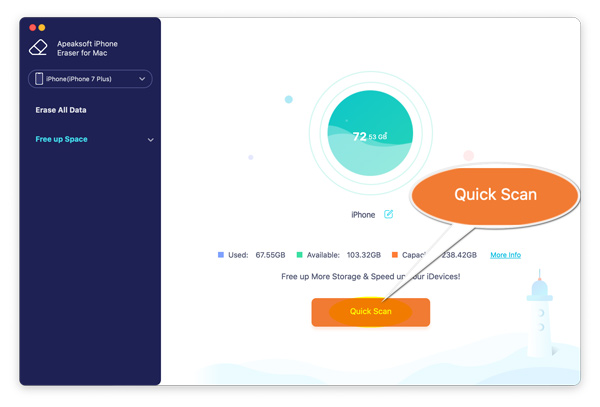
Then this software will scan all the junk files, applications, large files and photos quickly. You can select one data type and click Erase to start freeing up space quickly on iPhone.
To free up space on iPhone for every separate data type, you just move to the next part.
Erase Junk Files
Step 1: Scan Erase Junk Files
After connecting your iPhone to this computer, expand the tray of Free up Space from the left pane and select Erase Junk Files.
Then this software will start scanning your iPhone automatically.
Step 2: Erase junk files
When the scanning process is done, you can see all the junk files like image cache, iTunes cache, invalid files, crash log files, and so on.
Checkmark the box next to the types of junk files and click Erase to start erasing the junk files.
Explore more topics about erasing iPhone junk files:
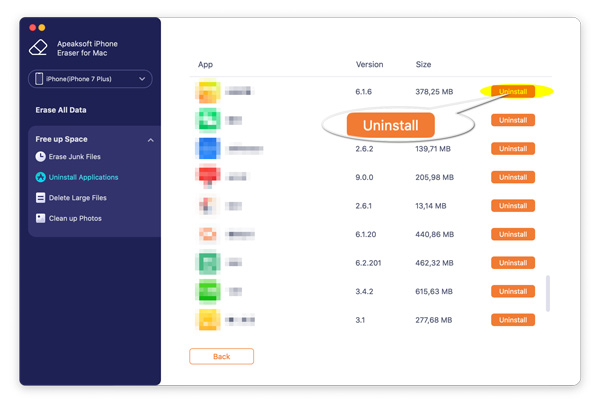
Uninstall Applications
Step 1: Scan applications on iPhone
Expand the tray of Free up Space from the left pane and select Uninstall Applications after connecting iPhone to this computer.
Then this program will begin scanning all the applications installed on your device.
Step 2: Uninstall apps
Once the scan is complete, you can see all the apps, not including the pre-installed apps, display on the right pane.
Click the Uninstall button next to the app to remove it from your device.
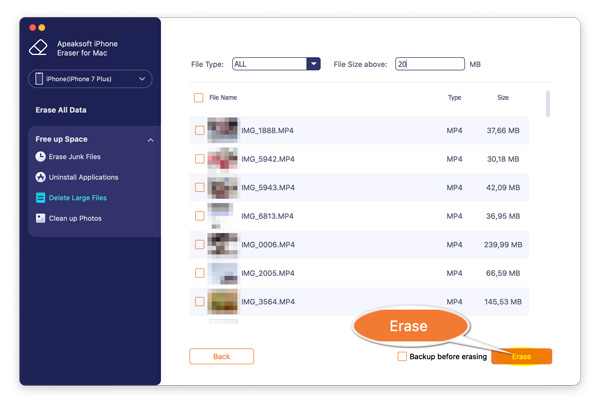
Delete Large Files
Step 1: Scan large files on iPhone
Expand the tray of Free up Space from the left pane and select Delete Large Files after connecting iPhone to this computer.
Then this tool will begin scanning all the large files on your iOS device.

Step 2: Delete large files
When the scan is finished, the filter feature at the top lets you filter the data type and file size to display on the right side.
Tick the boxes before the large files, and click the Erase button to delete the large files immediately.
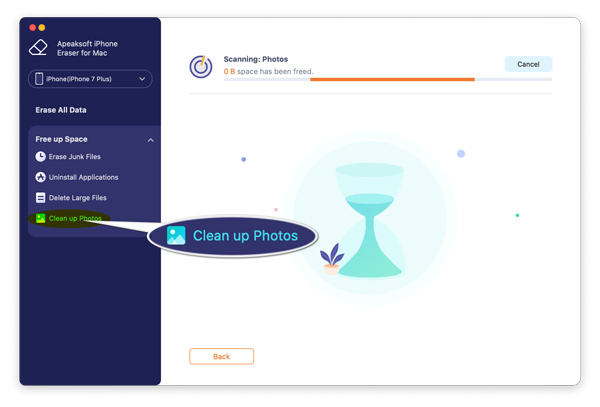
Clean up Photos
Step 1: Scan iPhone photos
Expand the tray of Free up Space from the left pane and select Clean up Photos after connecting your iOS device to this computer.
Then this tool will begin scanning all the photos on your iOS device.
Step 2: Backup & compress optionally
When the scanning process ends, you are given the options to Backup & Compress or Export & Delete the photos.
If you want to save the iPhone photos to computer before deleting them, just click Backup & Compress.
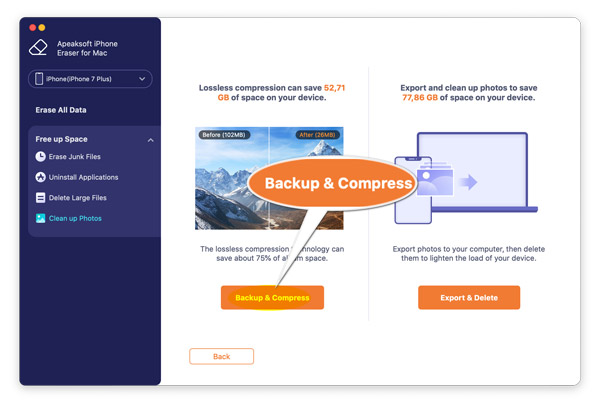
Then it will show all the photos and just select the ones that you want to backup, and click Compress.

If you have enough space on PC, and want to keep the original quality of the images, just tick the box next to Compress.

Step 3: Export & delete photos
For saving iPhone photos to computer and then deleting them from an iOS device, you should click Export & Delete.

Then all the images will display in this software.
Select the items that you want to export, click the Export button at the bottom and select the location to store those photos on your computer.

After that, you can checkmark the photos that you want to delete, and click the Delete button to remove them from your iOS device to free up more space.